C++ 프로그래머 가이드#
pylon을 처음 사용하시는 분이라면, Basler에서는 먼저 ‘pylon C++ 프로그래머 가이드’의 ‘시작하기’ 섹션을 읽어보며 pylon C++ API에 익숙해지실 것을 권장합니다.
C++ 프로그래밍 샘플#
The C++ samples are located in the C:\Program Files\Basler\pylon\Development\Samples\Stereo_ace\C++ folder.
The C++ samples are located in the /opt/pylon/share/pylon/Samples/Stereo_ace/C++/ folder.
The C++ samples are located in the /opt/pylon/share/pylon/Samples/Stereo_ace/C++/ folder.
샘플 빌드 전제 조건#
- pylon 26.06 이상
- Visual Studio 2019 or above
- CMake 3.3 or above
- CMake 3.3 or above
- 선택 사항: OpenCV 라이브러리
- 선택 사항: 포인트 클라우드 라이브러리(PCL)
샘플 구축#
- Copy the Development\Samples\Stereo_ace\C++ folder to a location where you have write permissions.
- Launch Microsoft Visual Studio.
- Click the Open a local folder button, navigate to the Samples\Stereo_ace\C++ folder, and press the Select button.
Wait until Visual Studio has finished generating the CMake cache. Once the cache generation has succeeded, the samples can be built and executed.
Open a command shell and enter the following commands:
OpenCV나 PCL이 발견되지 않으면, CMake는 누락된 라이브러리가 필요한 샘플만 건너뜁니다. 나머지 샘플은 여전히 빌드할 수 있습니다.
샘플을 빌드하거나 실행하는 데 문제가 발생하면 ‘문제 해결’ 항목을 확인하십시오.
OpenCV 라이브러리 설치#
You can download OpenCV here: https://github.com/opencv/opencv/releases
Make sure that you download a version of the OpenCV library that is compatible with the Visual Studio version you are going to use. If there is no suitable prebuilt version available, you have to build OpenCV from sources using the Visual Studio version you want to use for building your application.
If CMake fails to find OpenCV, set the OpenCV_DIR variable to the folder containing the OpenCVConfig.cmake file.
Examples
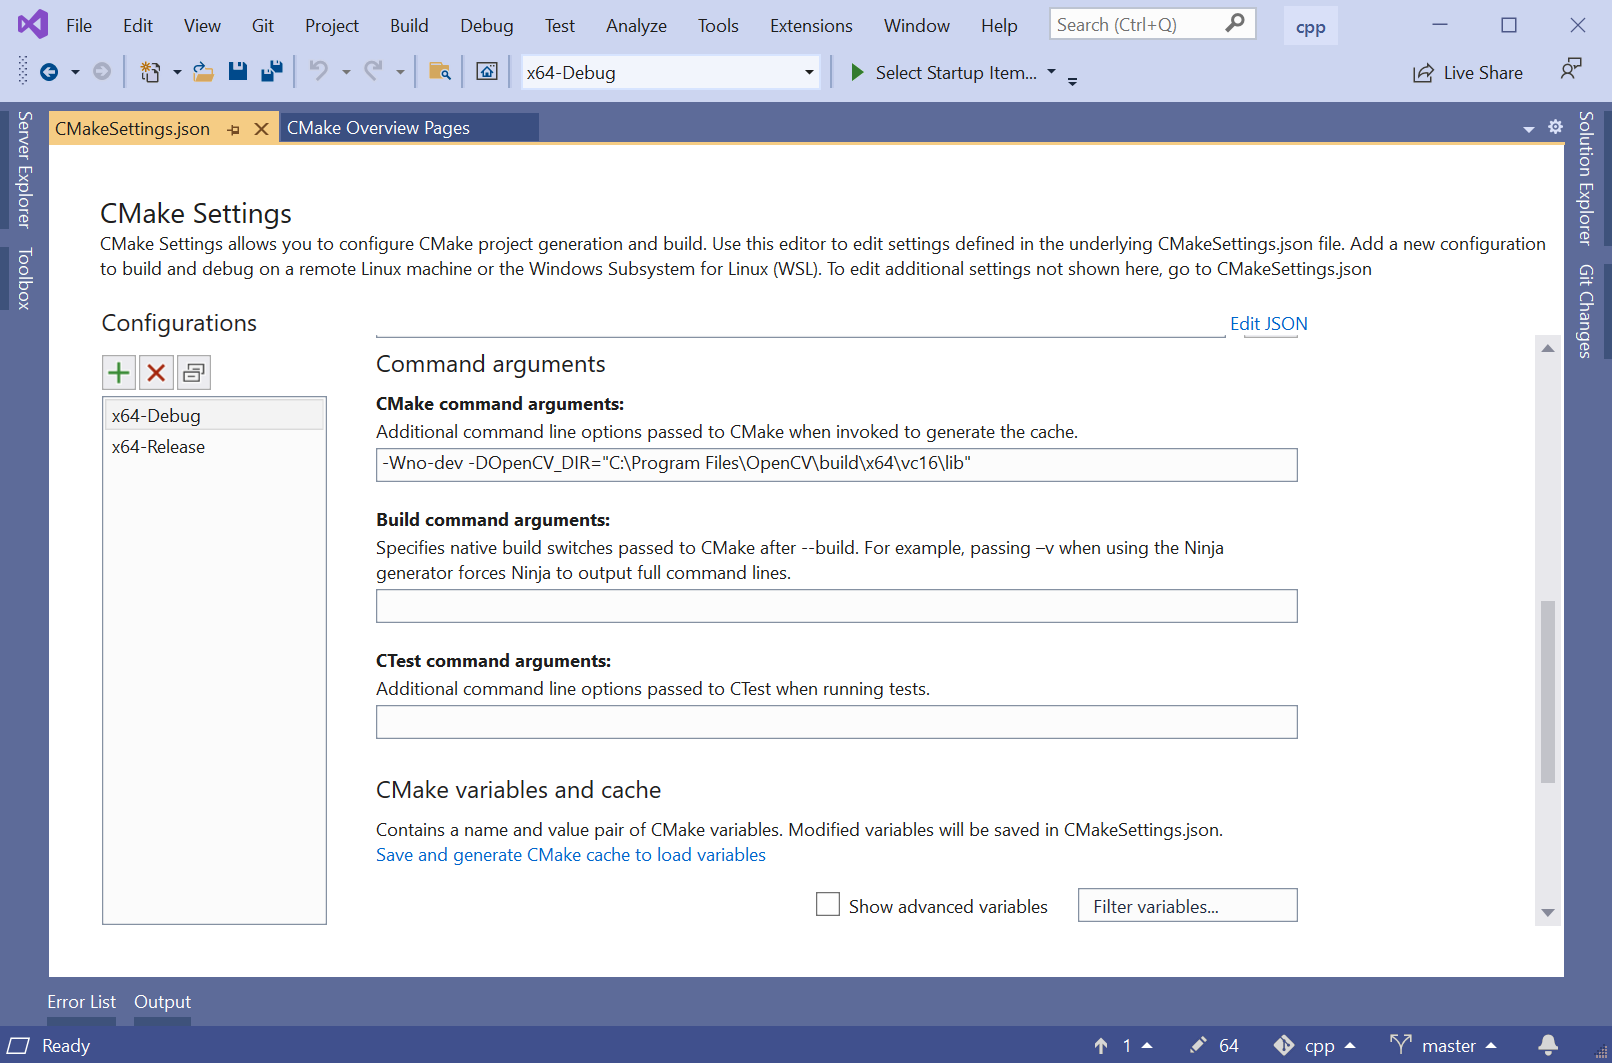
- Open the CMake Settings dialog (Project -> CMakeSettings for "Stereo ace samples")
- Enter the following command in the CMake command arguments field:
-DOpenCV_DIR="C:\Program Files\OpenCV\build\x64\vc16\lib" - Press Ctrl+S to save the changes.
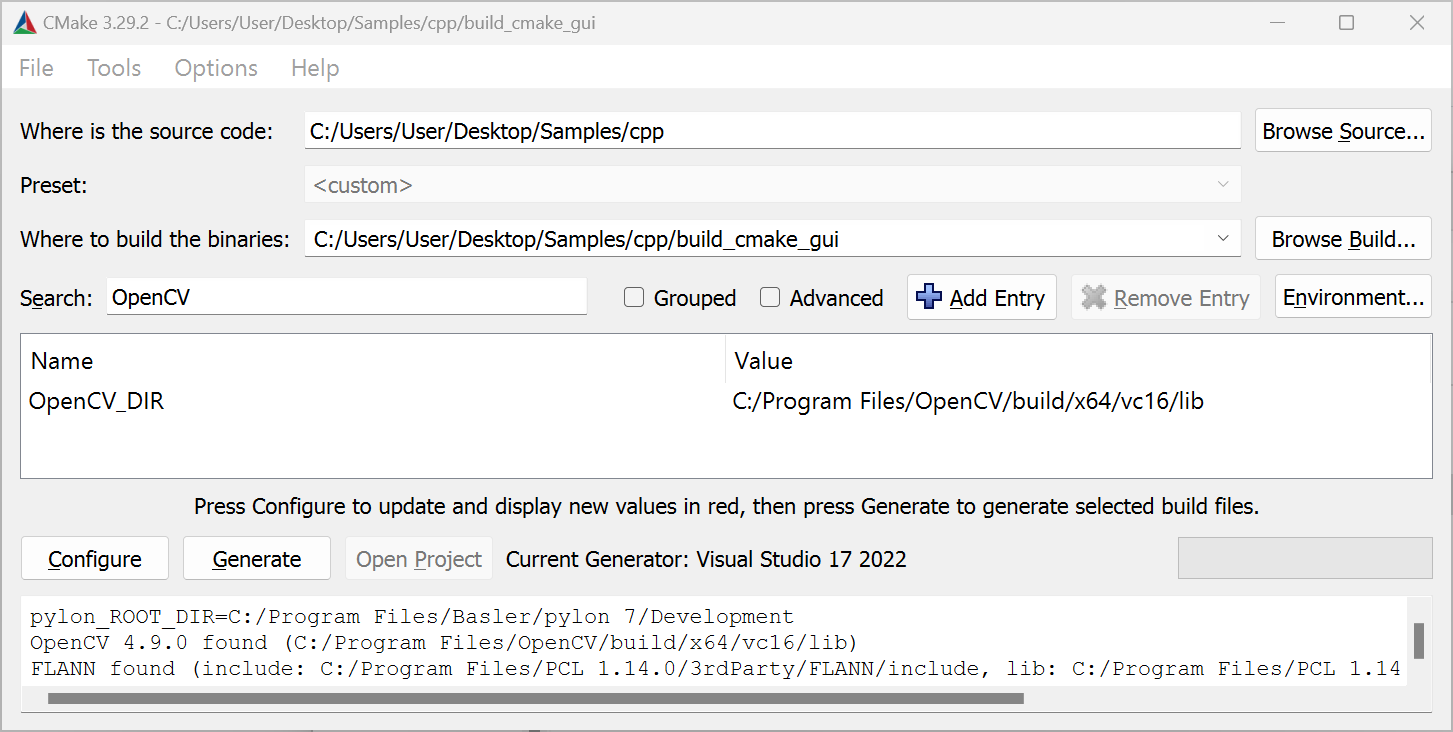
Before you can access the OpenCV_DIR in the CMake GUI, make sure that the Grouped check box is deselected in the CMake GUI.
Adding OpenCV to PATH Environment Variable#
You have to add the OpenCV bin directory to the PATH environment variable.
- Press the Win key.
- Type "environment".
- Click Edit environment variables for your account.
- In the User variables area, select Path.
- Click the Edit button.
- Click New.
- Enter the path of your OpenCV installation, e.g.:
C:\Program Files\OpenCV\build\x64\vc16\bin - Click OK.
If CMake fails to find the OpenCV library, you either have to install the libopencv development package or to build the OpenCV library from sources.
On Ubuntu systems, the libopencv development package can be installed by issuing the following command:
If you build the OpenCV library from sources and install it to a non-standard location, you can use the OpenCV_DIR CMake variable to specify the location where the OpenCVConfig.cmake files are located.
Example:
If CMake fails to find the OpenCV library, you either have to install the OpenCV development package or to build the OpenCV library from sources.
If you build the OpenCV library from sources and install it to a non-standard location, you can use the OpenCV_DIR CMake variable to specify the location where the OpenCVConfig.cmake files are located.
Example:
Point Cloud Library 설치#
You can download the PCL All-in-one Installer for Windows here: https://github.com/PointCloudLibrary/pcl/releases
Make sure that you download a version of the PCL that is compatible with the Visual Studio version you are going to use.
If CMake fails to find the PCL, set the PCL_DIR variable to the folder containing the PCLConfig.cmake file.
Examples
- Open the CMakeSettings.json file (CMake -> Change CMake Settings -> "Stereo ace samples").
- Add
-DPCL_DIR=\"C:\\Program Files\\PCL 1.9.1\\cmake\"to thecmakeCommandArgslist:
- Open the CMake Settings dialog (Project -> CMakeSettings for "Stereo ace samples").
- Enter the following string in the CMake command arguments field:
-DPCL_DIR="C:\Program Files\PCL 1.14.0\cmake". - Press Ctrl+S to save the changes.
Before you can access the PCL_DIR in the CMake GUI, make sure that the Grouped check box is deselected in the CMake GUI.
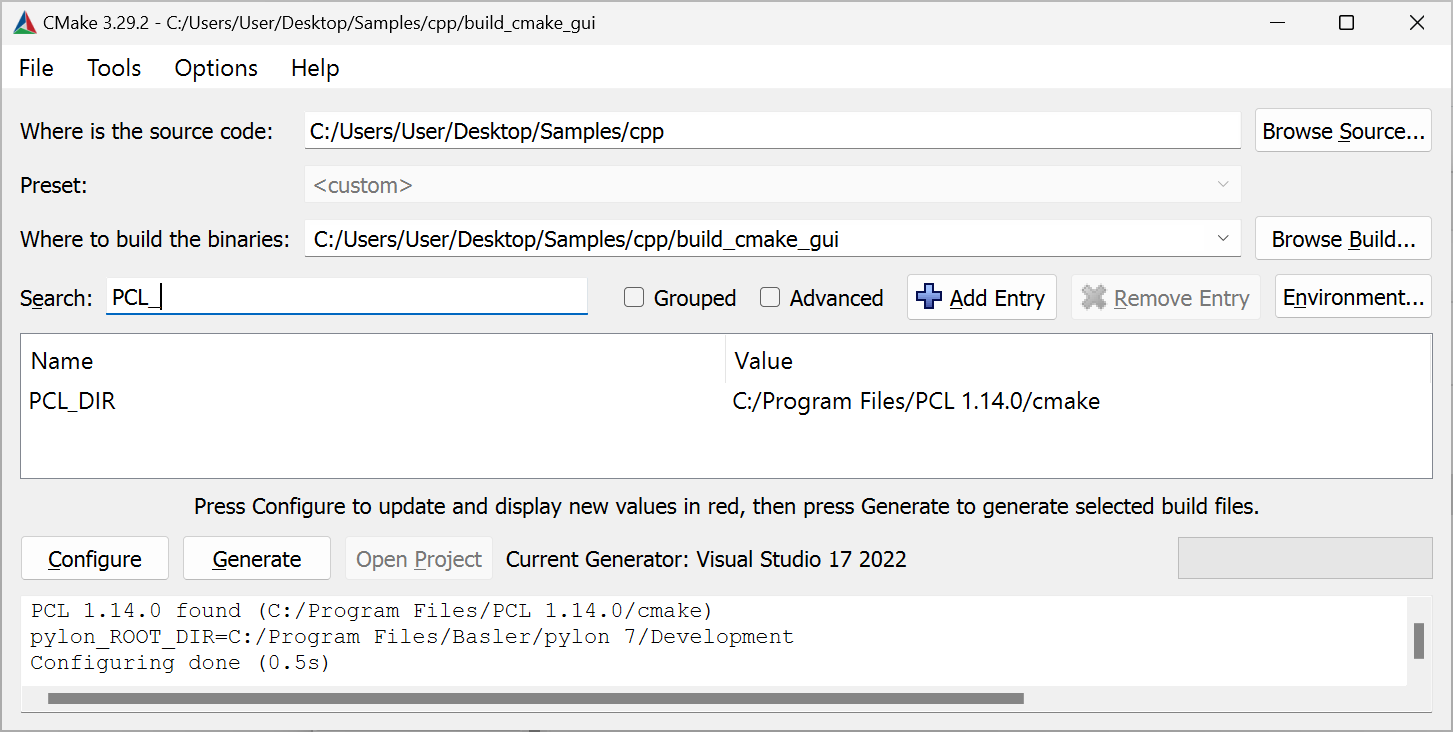
If the PCL is installed using the PCL All-in-one Installer, the installer takes care of adding the PCL bin directory to the PATH environment variable. If you're using a different installation method, you have to add the bin directory to the PATH environment variable yourself.
The PCL All-in-one Installer installs the OpenNI2.dll into the %ProgramFiles%\OpenNI2\Redist folder. The DLL is required at runtime. Either add this folder to your PATH environment variable, or copy the OpenNI2.dll to the folder the PCL binaries are located, e.g., %ProgamFiles%\PCL 1.13.0\bin.
If CMake fails to find the PCL library, you either have to install the libpcl development package or to build the PCL library from sources.
On Ubuntu systems, the libpcl development package can be installed by issuing the following command:
If you build the PCL from sources and install it to a non-standard location, the PCL_DIR CMake variable can be used to specify the location where the PCLConfig.cmake files is located.
Example:
Info
Samples using the Point Cloud Library (PCL) may crash depending on the versions of the PCL and VTK libraries installed on your system. The crash is due to a bug in the VTK libraries that are used by PCL for 3D visualization.
Source: https://github.com/PointCloudLibrary/pcl/issues/5237
Solution: PCL 1.13.1 contains fixes to work around the VTK bug.
Update to PCL 1.13.1 or higher. If required, uninstall the PCL libraries provided by your Linux distribution and build PCL version 1.13.1 or higher from sources (these can be retrieved from https://github.com/PointCloudLibrary/pcl).
If CMake fails to find the PCL library, you either have to install the PCL development package or to build the PCL library from sources.
If you build the PCL from sources and install it to a non-standard location, the PCL_DIR CMake variable can be used to specify the location where the PCLConfig.cmake files is located.
Example:
Info
Samples using the Point Cloud Library (PCL) may crash depending on the versions of the PCL and VTK libraries installed on your system. The crash is due to a bug in the VTK libraries that are used by PCL for 3D visualization.
Source: https://github.com/PointCloudLibrary/pcl/issues/5237
Solution: PCL 1.13.1 contains fixes to work around the VTK bug.
Update to PCL 1.13.1 or higher. If required, uninstall the PCL libraries provided by your Linux distribution and build PCL version 1.13.1 or higher from sources (these can be retrieved from https://github.com/PointCloudLibrary/pcl).
샘플 목록#
- FirstSample: Stereo ace 카메라 작동 및 3D 데이터 추출에 대한 소개.
- ParametrizeCamera: 카메라 파라미터에 액세스하는 방법을 설명합니다.
- DeviceRemovalHandling: 장치 제거 시의 처리 방식을 설명합니다.
- OpenDeviceByIpAddress: IP 주소 중 하나를 사용하여 Stereo ace 카메라를 여는 방법을 보여줍니다.
- GrabDepthMap: 깊이 맵을 추출하고 해석하는 방법을 설명합니다.
- SavePointcloud: OpenCV를 사용하지 않고 색상이 지정된 포인트 클라우드를 .ply 파일로 저장하는 방법을 설명합니다.
- SavePointcloudCV: OpenCV를 사용하여 강도 이미지, 디스패리티 이미지 및 컬러 포인트 클라우드를 파일로 저장하는 방법을 설명합니다.
- ShowPointcloud: Stereo ace 카메라로 캡처한 포인트 클라우드를 시각화하는 방법을 보여줍니다.
- TriggerLowLatency: 카메라의 강도 및 깊이 해상도를 ‘높음’ (2x2 비닝)으로 설정하여 지연 시간을 줄일 수 있는 방법을 보여줍니다.
- LeftAndRightIntensity: Stereo ace 카메라에서 좌측 및 우측 강도 이미지를 획득하는 방법을 보여줍니다.
자세한 내용은 C++ 샘플 디렉터리에 있는 샘플 코드를 참조하십시오.
애플리케이션 빌드 방법#
Using Visual Studio Solutions#
Refer to the Common Settings for Building Applications with pylon section of the pylon C++ Programmer's Guide to learn how to set up a project for building applications using pylon.
CMake 사용#
Stereo ace 용 철탑 보충 패키지에는 다음이 포함되어 있습니다. Findpylon.cmake Stereo ace 용 Pylon 및 Pylon 보충 패키지의 설치 위치를 확인하는 데 사용되는 모듈입니다. find 모듈은 다음을 내보냅니다. pylon::pylon CMake 타겟. 이 타겟을 인수로 전달하십시오. target_link_libraries, 그러면 CMake가 인클루드 경로, 라이브러리 경로 등을 자동으로 설정합니다.
기본적인 CMakeLists.txt CMake 파일은 다음과 같을 수 있습니다:
project (hello)

# Locate the CMake find module for pylon ...
# for Unix systems. All other OS PYLON_ROOT will be empty.
list(APPEND CMAKE_PREFIX_PATH $ENV{PYLON_ROOT})
# for Windows systems. All other OS PYLON_DEV_DIR will be empty.
list(APPEND CMAKE_PREFIX_PATH $ENV{PYLON_DEV_DIR})

find_package(pylon 12.0 REQUIRED)

add_executable(hello helloworld.cpp)
target_link_libraries(hello pylon::pylon)
project (hello)

# Locate the CMake find module for pylon ...
# for Unix system. All other OS PYLON_ROOT will be empty
list(APPEND CMAKE_PREFIX_PATH $ENV{PYLON_ROOT})
# for Windows system. All other OS PYLON_DEV_DIR will be empty
list(APPEND CMAKE_PREFIX_PATH $ENV{PYLON_DEV_DIR})

find_package(pylon 12.0 REQUIRED)

add_executable(hello helloworld.cpp)
target_link_libraries(hello pylon::pylon)
project (hello)

# Locate the CMake find module for pylon ...
# for Unix system. All other OS PYLON_ROOT will be empty
list(APPEND CMAKE_PREFIX_PATH $ENV{PYLON_ROOT})
# for Windows system. All other OS PYLON_DEV_DIR will be empty
list(APPEND CMAKE_PREFIX_PATH $ENV{PYLON_DEV_DIR})

find_package(pylon 12.0 REQUIRED)

add_executable(hello helloworld.cpp)
target_link_libraries(hello pylon::pylon)
[대상]을 위한 즉석 카메라 강좌 Stereo ace#
pylon은 카메라 장치에 액세스하기 위한 다양한 유형의 클래스를 제공합니다. 로우 레벨 IPylon 장치 외에도, 카메라를 위한 편리한 하이 레벨 API를 제공하는 소위 Instant Camera 클래스가 있습니다.
The Pylon::CInstantCamera 이 클래스는 모든 Basler 카메라에 대한 범용적인 접근 기능을 제공합니다.
Stereo ace 카메라의 경우, Stereo ace 용 파이론 보충 패키지에는 다음이 포함되어 있습니다. Pylon::CStereoAceInstantCamera 클래스. Basler는 이 클래스가 편리한 매개변수 접근 기능과 Stereo ace 전용 기능을 제공하므로, Basler Stereo ace 카메라에 이 클래스를 사용할 것을 권장합니다.
다음 기능을 사용하는 경우 CBaslerUniversalInstantCamera ... 대신 class CStereoAceInstantCamera 클래스에서도 Stereo ace 카메라에서 제공하는 모든 카메라 매개변수를 설정하고 가져올 수 있습니다. 만약 해당 CBaslerUniversalInstantCamera 클래스에서, 다음을 사용하십시오. 일반 파라미터 접근(generic parameter access) 에서 설명한 대로 이름으로 파라미터에 접근합니다. 일반 파라미터 접근(Generic Parameter Access) 『Pylon C++ 프로그래머 가이드』의 해당 섹션.
예:
using namespace Pylon;
GenApi::INodeMap& nodemap = camera.GetNodeMap();
CIntegerParameter depthSeg(nodemap, "BslDepthSeg" );
std::cout << "Segmentation: " << depthSeg.GetValue() << std::endl;
Stereo ace 카메라 열기 및 액세스하기#
Stereo ace 카메라 객체를 생성하고 여는 데는 세 단계가 필요합니다:
- 접근하려는 카메라의 카메라 객체를 생성합니다.
일반적으로 다음의 인스턴스를 생성해야 합니다.Pylon::CStereoAceInstantCamera클래스. - 필요한 경우 ` Stereo ace` 전용 구성 이벤트 핸들러를 등록하십시오(자세한 내용은 DeviceRemovalHandling.cpp 샘플을 참조하십시오).
- 애플리케이션에서
Open()메서드를 사용하여 카메라 장치와의 연결을 설정합니다.
다음 예시는 이러한 단계를 보여줍니다:
#include <pylon/PylonIncludes.h>
#include <pylon/StereoAceInstantCamera.h>
using namespace Pylon;

// ...

// Before using any pylon methods, the pylon runtime must be initialized.
PylonInitialize();

try {
    // 1: Create a camera object for the first available Stereo ace camera.
    CUniversalInstantInterface instantInterface(
        CInterfaceInfo().SetDeviceClass(Pylon::BaslerGenTlStaDeviceClass));
    CStereoAceInstantCamera camera(instantInterface.CreateFirstDevice());

    // 2. Register a default configuration if available (see samples).
    // camera.RegisterConfiguration(...);

    // 3. Open the camera, i.e., establish a connection to the camera device.
    camera.Open();

    // Use the camera.
    std::cout << "Connected to camera "
        << camera.GetDeviceInfo().GetFriendlyName() << std::endl;
    // ...

    // Close the connection.
    camera.Close();
} catch (const GenICam::GenericException& e) {
    std::cerr << "Exception occurred: " << std::endl
        << e.GetDescription() << std::endl;
}

// Releases all pylon resources.
PylonTerminate();
오류가 발생하면 다음에서 상속된 예외가 GenICam::GenericException 발생합니다.
일반적인 오류 조건:
- Stereo ace 카메라가 발견되지 않았습니다: The
CreateFirstDevice()함수에서 예외가 발생합니다. - 카메라를 열 수 없는 경우(예: 다른 애플리케이션에서 이미 열려 있는 경우):
Open()메서드에서 예외가 발생합니다.
다음 하위 섹션에서는 카메라 객체를 생성하고 여는 방법에 대한 보다 자세한 정보를 제공합니다.
사용 가능한 첫 번째 ‘ Stereo ace ’ 카메라에 대한 카메라 객체 생성#
다음 명령을 사용하여 Pylon::CTlFactory::CreateFirstDevice() 사용 가능한 첫 번째 ‘ Stereo ace ’ 카메라에 대한 카메라 객체를 생성하는 메서드입니다. ‘ Stereo ace ’ 카메라의 경우, 다음을 방지하기 위해 항상 ‘pylon’ 장치 클래스 식별자를 지정해야 합니다. CreateFirstDevice() 다른 유형의 카메라용 카메라 객체를 생성하는 것에서:
CUniversalInstantInterface instantInterface(
    CInterfaceInfo().SetDeviceClass(Pylon::BaslerGenTlStaDeviceClass));
CStereoAceInstantCamera camera(instantInterface.CreateFirstDevice());
Stereo ace 카메라가 감지되지 않는 경우, 카메라와 사용 중인 네트워크 어댑터의 IP 구성 설정을 확인하십시오. 네트워크 설정에 대한 자세한 내용은 Basler 제품 설명서의 ‘네트워크 구성’ 항목을 참조하십시오.
Stereo ace 의 특정 카메라에 대한 카메라 객체 생성#
특정 Stereo ace 카메라를 열려면, 장치 클래스 외에도 다른 속성을 지정할 수 있습니다.
Stereo ace 카메라의 일련번호를 사용하여 특정 카메라를 열려면 다음 명령어를 사용하십시오:
CUniversalInstantInterface instantInterface(
    CInterfaceInfo().SetDeviceClass(Pylon::BaslerGenTlStaDeviceClass));
CStereoAceInstantCamera camera(instantInterface.CreateFirstDevice(
    CDeviceInfo().SetSerialNumber("40410842")));
Stereo ace 카메라를 사용자 정의 이름으로 열려면 다음 명령어를 사용하십시오:
CUniversalInstantInterface instantInterface(
    CInterfaceInfo().SetDeviceClass(Pylon::BaslerGenTlStaDeviceClass));
CStereoAceInstantCamera camera(instantInterface.CreateFirstDevice(
    CDeviceInfo().SetUserDefinedName("MyCamera")));
User-Defined Names
다음 항목을 사용하여 카메라에 사용자 지정 이름을 할당할 수 있습니다. DeviceUserID 매개변수. 이 작업은 ‘ pylon 3D Viewer ’ 또는 ‘ pylon API ’에서 수행할 수 있습니다:
IP 주소로 장치 생성
현재는 다음을 사용하여 카메라 IP 주소를 지정할 수 없습니다. CreateFirstDevice() function. 그 이유는 현재 다음 항목에 Pylon::CDeviceInfo() class가 카메라의 IP 주소에 대한 어떠한 정보도 포함하고 있지 않기 때문입니다.
The OpenDeviceByIpAddress 이 예제는 Stereo ace 카메라의 IP 주소 중 하나를 사용하여 카메라에 접속하는 방법을 보여줍니다.
원하는 ‘ Stereo ace ’ 카메라가 검색되지 않는 경우, 속성에 올바른 값이 설정되어 있는지 확인하고, 카메라 및 네트워크 어댑터의 IP 구성 설정을 점검해 보십시오. 네트워크 설정에 대한 자세한 내용은 Basler 제품 설명서의 ‘네트워크 구성’ 항목을 참조하십시오.
Stereo ace 카메라 열거하기#
다음 코드 예제는 연결된 모든 Stereo ace 카메라 목록을 가져오는 방법을 보여줍니다. 목록의 각 요소에 대해 카메라를 열고, 일부 카메라 매개변수 값을 출력합니다.
#include <pylon/PylonIncludes.h>
#include <pylon/StereoAceInstantCamera.h>
#include <ostream>
using namespace Pylon;

// ....

// Before using any pylon methods, the pylon runtime must be initialized.
PylonInitialize();

// ....

// Enumerate all Stereo ace cameras.
CTlFactory& TlFactory = CTlFactory::GetInstance();
DeviceInfoList_t lstDevices;
DeviceInfoList_t filter;
filter.push_back(CDeviceInfo().SetDeviceClass(BaslerGenTlStaDeviceClass));
TlFactory.EnumerateDevices(lstDevices, filter);
if (!lstDevices.empty()) {
    DeviceInfoList_t::const_iterator it;
    for (it = lstDevices.begin(); it != lstDevices.end(); ++it) {
        std::cout << it->GetFullName();

        // Open camera, i.e., establish a connection to the camera device.
        CStereoAceInstantCamera camera(CTlFactory::GetInstance().CreateDevice(*it));
        // Optionally register configuration(s) here.
        camera.Open();

        // Print out some information.
        std::cout << "Connected to camera "
            << camera.GetDeviceInfo().GetFriendlyName() << std::endl;
        std::cout << "IP Address: "
            << camera.GevCurrentIPAddress.GetValue() << std::endl;
        std::cout << "User-defined name: "
            << camera.DeviceUserID.GetValue() << std::endl;
        std::cout << "Serial Number: "
            << camera.DeviceSerialNumber.GetValue() << std::endl;
}  // The connection will be closed automatically when leaving the scope here.
else {
    std::cerr << "No devices found!" << std::endl;
}
카메라 설정 핸들러 등록#
pylon Instant Camera 클래스를 사용하면 특정 이벤트(예: Open() method 호출 시) 발생 시 카메라 설정을 적용하는 데 사용할 수 있는 구성 이벤트 핸들러 객체를 등록할 수 있습니다.
다음 예제는 추가 설정을 적용하는 구성 이벤트 핸들러를 등록하는 방법을 보여줍니다.
class MyConfigurationHandler : public StereoAceConfigurationEventHandler
{
public:
    // Sets exposure time to minimum possible value.
    void OnOpened(CStereoAceInstantCamera& camera) override
    {
        camera.ExposureTime.SetToMinimum();
    }
};

// ....

// Then, register configuration event handlers.
camera.RegisterConfiguration(
      new MyConfigurationHandler,
      RegistrationMode_Append, Cleanup_Delete);

// ....

camera.Open(); // Configurations will be applied.
pylon 카메라 이벤트 핸들러 클래스에 대한 자세한 내용은 『pylon C++ 프로그래머 가이드』의 “인스턴트 카메라 이벤트 핸들러 기본 사항” 섹션을 참조하십시오.
구성 이벤트 핸들러를 지정하여 원하는 설정을 적용하고 싶지 않다면, CStereoAceInstantCamera::Open() 메서드를 호출하여 매개변수를 설정할 수 있습니다.
카메라 매개변수 값을 설정하고 가져오는 방법에 대한 정보는 “카메라 매개변수 설정” 섹션을 참조하십시오.
카메라 연결#
카메라 객체를 생성하고 구성 이벤트 핸들러를 등록한 후, 다음 메서드를 호출하여 CStereoAceInstantCamera::Open() 메서드를 호출하여 매개변수를 설정할 수 있습니다.
카메라와의 연결이 수립됩니다. 연결은 다음 CStereoAceInstantCamera::Close() 메서드가 호출될 때까지 유지됩니다. CStereoAceInstantCamera 의 소멸자는 명시적으로 호출되지 않은 경우 Close() 을(를) 자동으로 호출합니다.
카메라는 주기적으로 하트비트 요청을 수신하지 못하면 연결을 종료합니다. 애플리케이션이 충돌하거나 디버거에 의해 중단될 경우 하트비트 요청이 누락됩니다.
카메라 매개변수 설정#
pylon API 를 사용하여 카메라 매개변수에 접근하는 방법을 익히려면, pylon C++ 프로그래머 가이드의 “매개변수 액세스” 섹션을 참조하십시오.
pylon C++ 예제인 Parametrize_NativeParameterAccess와 Parametrize_GenericParameterAccess는 pylon을 사용하여 카메라 매개변수에 접근하는 일반적인 방법을 보여줍니다.
다음 코드 예제는 다음을 사용하여 자주 사용되는 Stereo ace 전용 카메라 매개변수를 설정하고 가져오는 방법을 보여줍니다. CStereoAceInstantCamera 클래스.
// Include files to use the pylon API
#include <pylon/PylonIncludes.h>
#include <pylon/StereoAceInstantCamera.h>

// Namespaces for using the pylon API and the Stereo ace camera parameters
using namespace Pylon;
using namespace StereoAceCameraParams_Params;


// Set the exposure time of the camera.
camera.ExposureTime.SetValue(5000); // us

// Set the gain.
camera.Gain.SetValue(0.0);

// Set the illumination mode (e.g., AlwaysActive, AlternateActive, Off).
camera.BslIlluminationMode.SetValue(BslIlluminationMode_AlwaysActive);

// Set the illumination strength (0.0 ... 1.0).
camera.BslIlluminationStrength.SetValue(1.0);

// Set the minimum and maximum depth for the working area.
camera.BslDepthMinDepth.SetValue(200); // mm
camera.BslDepthMaxDepth.SetValue(2000); // mm

// Set the output resolutions.
CEnumParameter(camera.GetNodeMap(), "BslDepthResolution").SetValue("High");
CEnumParameter(camera.GetNodeMap(), "BslIntensityResolution").SetValue("Full");

// The producer derives the internal binning and scaling settings automatically.

// Print out current parameter values.
std::cout << "Exposure Time            : "
    << camera.ExposureTime.GetValue() << std::endl;
std::cout << "Gain                     : "
    << camera.Gain.GetValue() << std::endl;
std::cout << "Illumination Mode        : "
    << camera.BslIlluminationMode.GetValue() << std::endl;
std::cout << "Illumination Strength    : "
    << camera.BslIlluminationStrength.GetValue() << std::endl;
std::cout << "Min Depth                : "
    << camera.BslDepthMinDepth.GetValue() << std::endl;
std::cout << "Max Depth                : "
    << camera.BslDepthMaxDepth.GetValue() << std::endl;
std::cout << "Depth Resolution         : "
    << CEnumParameter(camera.GetNodeMap(), "BslDepthResolution").ToString() << std::endl;
std::cout << "Intensity Resolution     : "
    << CEnumParameter(camera.GetNodeMap(), "BslIntensityResolution").ToString() << std::endl;
pylon 3D Viewer 에는 ‘문서’ 창이 제공됩니다. ‘기능’ 창에서 카메라 매개변수를 선택하면, ‘문서’ 창에는 선택한 매개변수에 대한 정보와 함께 해당 카메라 매개변수의 값을 가져오고 설정하는 방법을 보여주는 C++ 및 C# 코드 예제가 표시됩니다.
데이터 획득#
pylon API 를 사용하여 데이터를 수집하는 방법에 대해 자세히 알아보려면, ‘pylon C++ 프로그래머 가이드’의 ‘이미지 캡처’ 섹션을 참조하십시오.
pylon은 캡처된 이미지를 GrabResults라는 데이터 구조로 표현합니다. Stereo ace 카메라로 획득한 GrabResults는 여러 구성 요소를 포함합니다. 기본적으로 각 GrabResult에는 강도 이미지, 디스패리티 맵 및 추가 정보가 저장됩니다.
// Enable disparity maps by enabling the Disparity component and setting the
// appropriate pixel format.
camera.ComponentSelector.SetValue(ComponentSelector_Disparity);
camera.ComponentEnable.SetValue(true);
다음 내용을 참조하십시오. Component Selector 및 Pixel Format Basler 제품 설명서의 관련 항목을 참조하십시오.
그랩 루프#
pylon은 이미지 취득 루프를 설정하는 다양한 접근 방식을 지원하며, 메모리 버퍼를 처리하기 위한 여러 가지 전략을 제공합니다.
자세한 내용은 ‘pylon C++ 프로그래머 가이드’의 ‘이미지 캡처’ 섹션을 참조하십시오.
다음 코드 조각은 다음을 사용하는 일반적인 그랩 루프를 보여줍니다. CStereoAceInstantCamera 클래스:
#include <pylon/PylonIncludes.h>
#include <pylon/StereoAceInstantCamera.h>

using namespace Pylon;
using namespace StereoAceCameraParams_Params;


PylonInitialize();

CUniversalInstantInterface instantInterface(
    CInterfaceInfo().SetDeviceClass(Pylon::BaslerGenTlStaDeviceClass));
CStereoAceInstantCamera camera(instantInterface.CreateFirstDevice());
camera.Open();

size_t nBuffersGrabbed = 0;

// This smart pointer will receive the grab result data.
CGrabResultPtr ptrGrabResult;

camera.StartGrabbing();

while (camera.IsGrabbing() && nBuffersGrabbed < 10) {
    // Wait for an image and then retrieve it. A timeout of 1000 ms is used.
    camera.RetrieveResult(1000, ptrGrabResult, TimeoutHandling_ThrowException);

    // Data grabbed successfully?
    if (ptrGrabResult->GrabSucceeded()) {
        nBuffersGrabbed++;
        // Access the data.
        // ...existing code...
    } else {
        // Error handling
        std::cerr << "Grab error occurred: "
            << ptrGrabResult->GetErrorDescription() << std::endl;
    }
}
// Clean-up
camera.StopGrabbing();
camera.Close();
컴포넌트 접근#
GrabResult의 개별 이미지 구성 요소에 접근하려면 다음을 사용하십시오. Pylon::CGrabResultData::GetFirstImageDataComponent() 메서드를 호출하고 원하는 컴포넌트 유형을 지정합니다. 이 메서드는 Pylon::CPylonDataComponent 이미지 데이터(예: 깊이 값)와 해당 메타데이터를 모두 포함하고 있는 것입니다.
파라미터를 원하는 throwIfNotFound 인수를 false 누락된 구성 요소가 예외를 발생시키지 않고 유효하지 않은 구성 요소를 반환하는 경우. 항상 CPylonDataComponent::IsValid() 요청된 컴포넌트를 찾아낸 후 해당 데이터에 접근하기 전에 이를 확인하는 방법.
pylon이 여러 구성 요소를 포함하는 GrabResults에 대한 액세스를 제공하는 방법에 대한 자세한 내용은 ‘pylon C++ 프로그래머 가이드’의 “고급 주제” 장에 있는 “다중 구성 요소 Grab 결과” 섹션을 참조하십시오.
예:
if (ptrGrabResult->GrabSucceeded()) {
    const auto intensityComponent =
        ptrGrabResult->GetFirstImageDataComponent(
            EComponentType::ComponentType_Intensity, 0, false);
    if (!intensityComponent.IsValid()) {
        throw std::runtime_error(
            "Buffer doesn't contain an intensity component.");
    }

    const auto disparityComponent =
        ptrGrabResult->GetFirstImageDataComponent(
            EComponentType::ComponentType_Disparity, 0, false);
    if (!disparityComponent.IsValid()) {
        throw std::runtime_error(
            "Buffer doesn't contain a disparity component.");
    }

} else {
    std::cerr << "Grab error: " << ptrGrabResult->GetErrorCode() << " "
              << ptrGrabResult->GetErrorDescription() << std::endl;
}