C++ 프로그래머 가이드#
pylon을 처음 사용하는 경우, Basler는 pylon C++ Programmer's Guide의 Getting Started 섹션을 읽고 pylon C++ API에 먼저 익숙해질 것을 권장합니다.
정보
이 항목의 모든 정보는 모든 blaze 및 Smart blaze 카메라 모델에 적용됩니다. 간결함을 위해 모든 모델을 통틀어 "blaze"로 지칭합니다.
C++ 프로그래밍 샘플#
To open the folder containing the programming samples for blaze cameras, press the Win key, go to the Basler folder, and choose blaze Samples. A File Explorer window opens. The C++ programming samples are located in the cpp folder.
The C++ samples are located in the /opt/pylon/share/pylon/Samples/blaze/cpp folder.
샘플 빌드 전제 조건#
- Visual Studio 2017 or above
- Optional: OpenCV library
- Optional: Point Cloud Library (PCL)
- Optional: Boost libraries
- CMake 3.3 or above
- Optional: Aravis
On an Ubuntu system, you can install the prerequisites by issuing the following command:
Info
There is no Debian package available for the Aravis library. Aravis must be built from sources instead.
샘플 빌드 방법#
정보
샘플을 빌드하기 전에 읽기 및 쓰기 권한이 있는 원하는 위치에 샘플이 포함된 폴더를 복사하십시오.
C++ 샘플 빌드를 위해 CMake가 빌드 시스템으로 사용됩니다.
Windows#
- Start Visual Studio.
- On the start page, choose the Open Folder or Open a local folder option, and navigate to the folder you copied the samples to.
- Open the cpp subfolder and click the Select Folder button.
Visual Studio runs CMake in the background. It will take a moment until you can build the samples by selecting Build All in the Build menu.
When you don't want to use Visual Studio's CMake integration, you can use the cmake-gui tool to generate Visual Studio solution and project files that you can open with Visual Studio.
If there is no CMake >= 3.3 installed, download a CMake Windows installer from the CMake website. Launch the .msi installer and follow the instructions.
To generate Visual Studio project and solution files for the blaze samples:
- Start cmake-gui.
- Click the Browse Source… button, and navigate to the folder you copied the samples to.
- Open the cpp folder by clicking the Select folder button.
- Specify a folder where the binaries will be built by clicking the Browse Build… button and choosing or creating a folder of your choice.
Basler advises against choosing the root folder of the source tree, i.e., the folder this document is located in. Common practice is to create a subfolder (e.g., namedbuild). - Click the Configure button.
A dialog opens. - Choose the desired Visual Studio version and platform.
Make sure that the selected platform (x86 or x64) matches the architecture that the OpenCV and PCL libraries are built for. - Click the Finish button to close the dialog.
The configuration procedure starts. - Once the configuration procedure has succeeded, click the Generate button to create the Visual Studio project and solution files.
The files will be generated in the build folder that you specified earlier. - Navigate to that build folder and open the .sln file.
Now, you can build the samples by selecting Build All in the Build menu.
샘플 빌드 및 실행 중에 문제가 발생하는 경우 문제 해결 항목을 참조하십시오.
Linux#
샘플을 빌드하려면 셸을 열고 샘플을 복사한 폴더로 이동합니다. 그런 다음 cpp 하위 폴더로 이동하여 다음 명령을 실행합니다.
CMake가 pylon SDK를 찾지 못하는 경우, pylon SDK 및 pylon Supplementary Package for blaze가 올바르게 설치되었는지 확인하십시오.
/opt/pylon 이외의 위치에 소프트웨어를 설치한 경우, PYLON_ROOT 환경 변수가 pylon 및 보조 패키지를 설치한 폴더로 설정되어 있는지 확인하십시오.
예:
CMake가 OpenCV 라이브러리나 PCL을 찾지 못하는 경우, OpenCV 라이브러리 및 PCL용 개발 패키지가 설치되어 있는지 확인하십시오.
샘플 빌드 및 실행 중에 문제가 발생하는 경우 문제 해결 항목을 참조하십시오.
OpenCV 라이브러리 설치#
Windows#
GitHub에서 OpenCV를 다운로드할 수 있습니다.
사용하려는 Visual Studio 버전과 호환되는 OpenCV 라이브러리 버전을 다운로드해야 합니다. 적합한 사전 빌드 버전이 없는 경우, 애플리케이션 빌드에 사용할 Visual Studio 버전을 사용하여 소스에서 직접 OpenCV를 빌드해야 합니다.
CMake가 OpenCV를 찾지 못하는 경우, OpenCV_DIR 변수를 OpenCVConfig.cmake 파일이 포함된 폴더로 설정하십시오.
예제
- Open the CMakeSettings.json file (CMake -> Change CMake Settings -> blazeCppSamples).
- Add the following to the cmakeCommandArgs list:
-DOpenCV_DIR=\"C:\\Program Files\\OpenCV\\build\\x64\\vc16\\lib\"
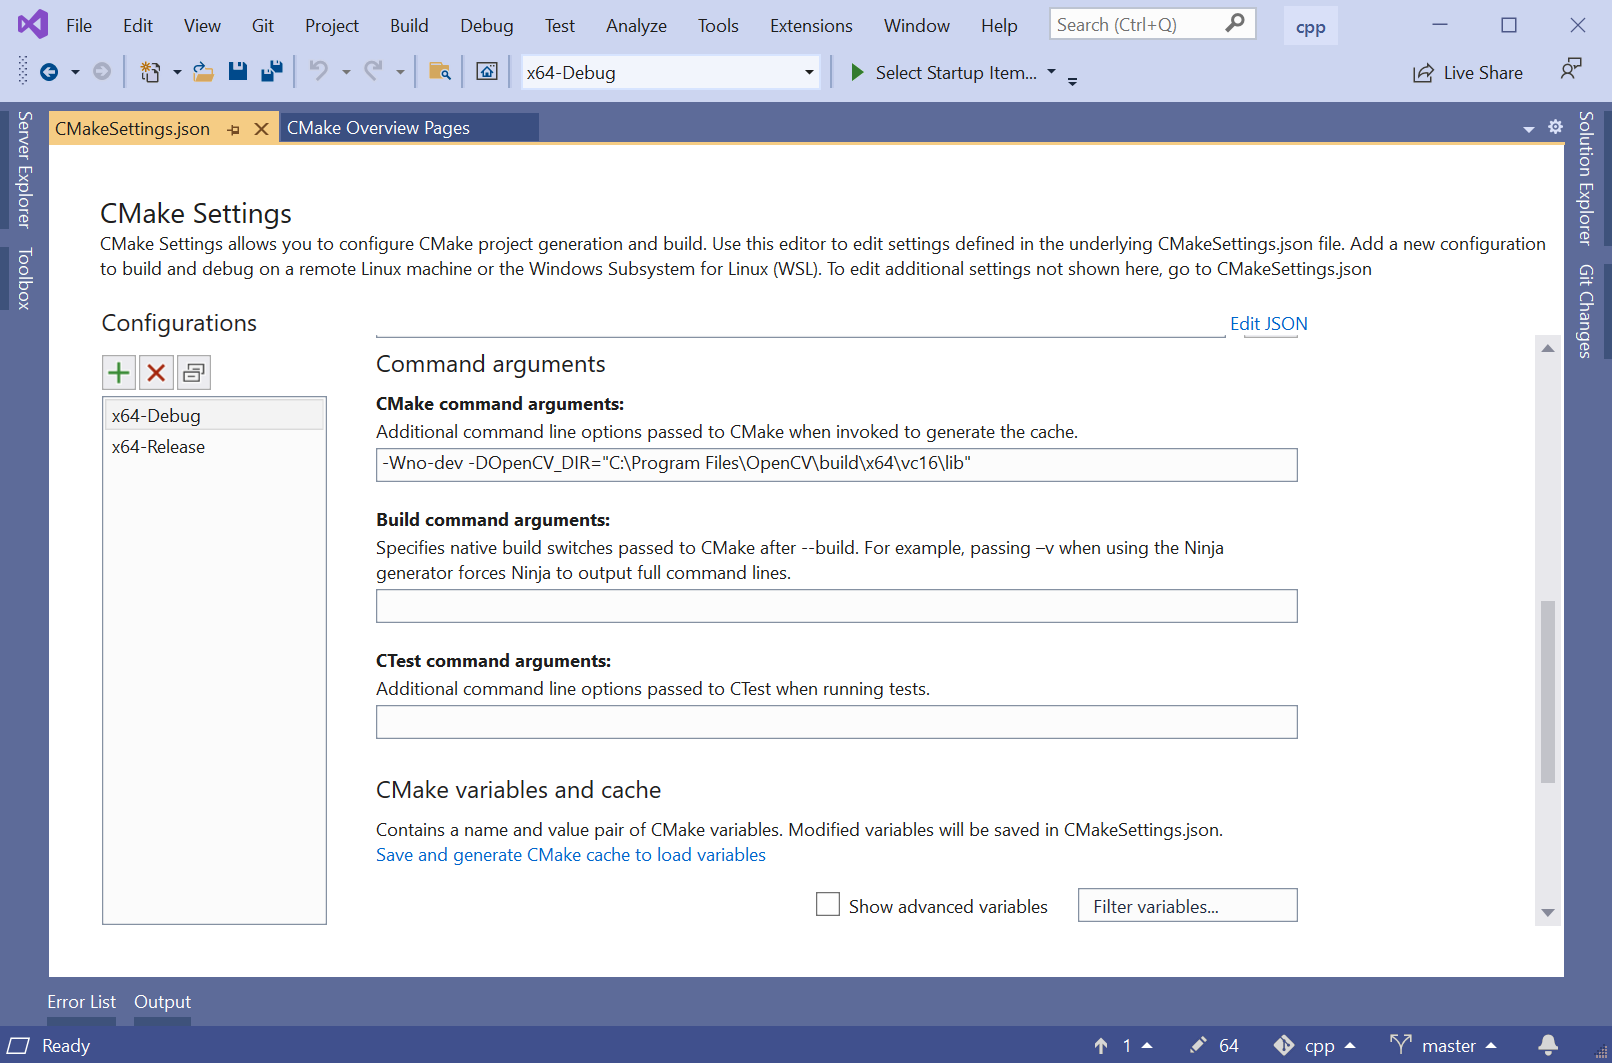
- Open the CMake Settings dialog (Project -> CMakeSettings for blazeCppSamples).
- Enter the following in the CMake command arguments field:
-DOpenCV_DIR="C:\Program Files\OpenCV\build\x64\vc16\lib" - Press Ctrl S to save the changes.
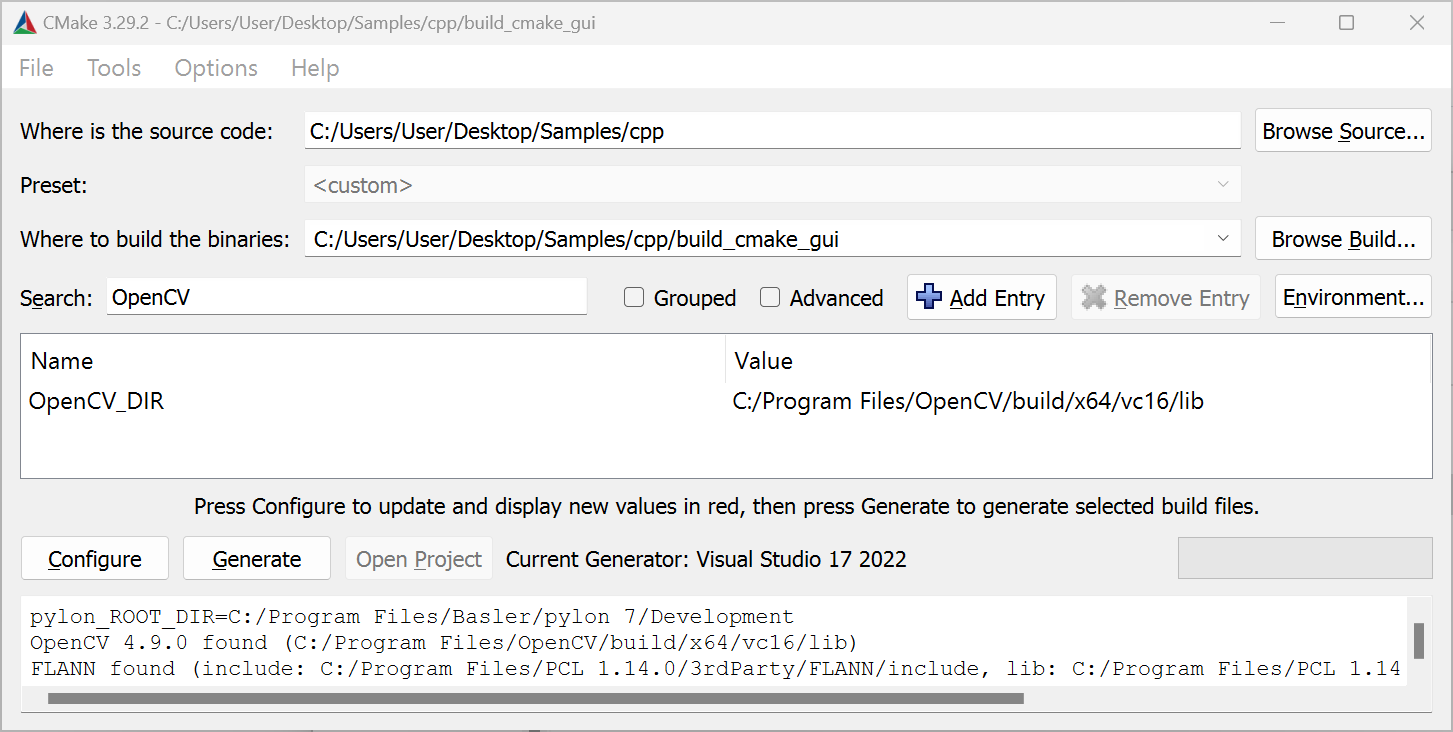
Before you can access the OpenCV_DIR in the CMake GUI, make sure that the Grouped check box is deselected in the CMake GUI.
PATH 환경 변수에 OpenCV 추가#
OpenCV bin 디렉토리를 PATH 환경 변수.
- Win 키를 누릅니다.
- "environment"를 입력합니다.
- 계정 환경 변수 편집을 클릭합니다.
- 환경 변수… 버튼을 클릭합니다.
- 사용자 변수 영역에서 Path를 선택합니다.
- 편집 버튼을 클릭합니다.
- 새로 만들기를 클릭합니다.
- 예: C:\Program Files\OpenCV\build\x64\vc16\bin과 같이 OpenCV 설치 경로를 입력합니다.
- OK를 클릭합니다.
Linux#
CMake가 OpenCV 라이브러리를 찾지 못하는 경우, libopencv 개발 패키지를 설치하거나 소스에서 OpenCV 라이브러리를 빌드해야 합니다.
Ubuntu 시스템에서는 다음 명령을 실행하여 libopencv 개발 패키지를 설치할 수 있습니다.
소스에서 OpenCV 라이브러리를 빌드하여 기본값이 아닌 위치에 설치하는 경우, OpenCV_DIR CMake 변수를 사용하여 위치를 지정할 수 있으며, 해당 위치에는 OpenCVConfig.cmake 파일이 위치합니다.
예:
Point Cloud Library 설치#
Windows#
Windows용 PCL All-in-one Installer는 GitHub에서 다운로드할 수 있습니다.
사용하려는 Visual Studio 버전과 호환되는 PCL 버전을 다운로드해야 합니다.
CMake가 PCL을 찾지 못하는 경우, PCL_DIR 변수를 다음이 포함된 폴더로 설정하세요. PCLConfig.cmake 파일
예제
- Open the CMakeSettings.json file (CMake -> Change CMake Settings -> blazeCppSamples)
- Add the following to the
cmakeCommandArgslist:-DPCL_DIR=\"C:\\Program Files\\PCL 1.9.1\\cmake\"
- Open the CMake Settings dialog (Project -> CMakeSettings for blazeCppSamples).
- Enter the following in the CMake command arguments field:
-DPCL_DIR="C:\Program Files\PCL 1.12.1\cmake" - Press Ctrl S to save the changes.
- Open the CMake Settings dialog (Project -> CMakeSettings for blazeCppSamples).
- Enter the following in the CMake command arguments field:
-DPCL_DIR="C:\Program Files\PCL 1.14.0\cmake" - Press Ctrl S to save the changes.
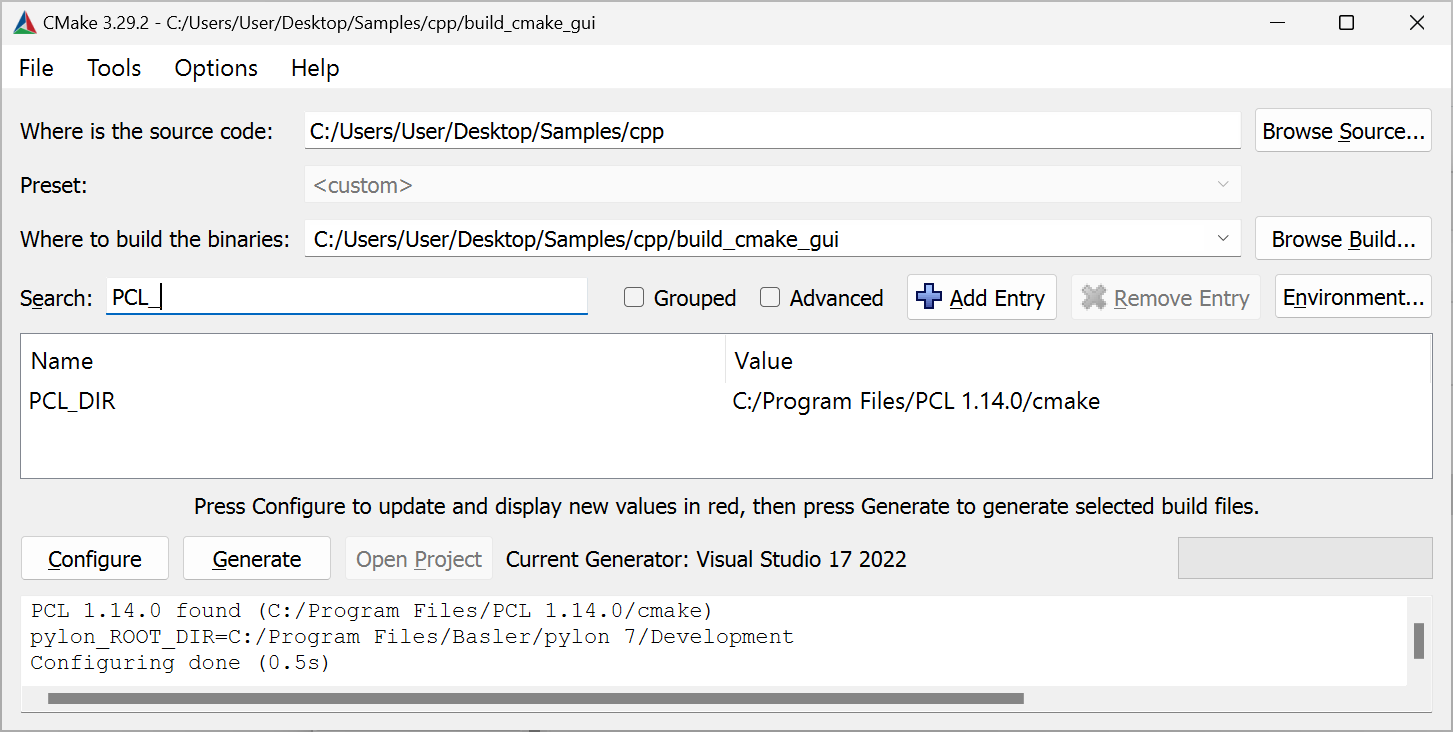
Before you can access the PCL_DIR in the CMake GUI, make sure that the Grouped check box is deselected in the CMake GUI.
PCL All-in-one Installer를 사용하여 PCL을 설치하면 설치 프로그램이 PCL 추가 작업을 처리합니다. bin 디렉토리를 PATH 환경 변수. 다른 설치 방법을 사용하는 경우, 사용자가 직접 추가해야 합니다. bin 디렉토리를 PATH 환경 변수를 직접 설정해야 합니다.
PCL All-in-one Installer는 다음을 설치합니다. OpenNI2.dll 다음 폴더로: %ProgramFiles%\OpenNI2\Redist 폴더. 런타임 시 DLL이 필요합니다. 이 폴더를 다음 위치에 추가하거나 PATH 환경 변수를 설정하거나, OpenNI2.dll PCL 바이너리가 있는 폴더(예: %ProgamFiles%\PCL 1.13.0\bin.
Linux#
CMake가 PCL 라이브러리를 찾지 못하는 경우, libpcl 개발 패키지를 설치하거나 소스에서 PCL 라이브러리를 빌드해야 합니다.
Ubuntu 시스템에서는 다음 명령을 실행하여 libpcl 개발 패키지를 설치할 수 있습니다.
소스에서 PCL을 빌드하고 비표준 위치에 설치하는 경우, PCL_DIR CMake 변수를 사용하여 위치를 지정할 수 있으며, 해당 위치에는 PCLConfig.cmake 파일이 위치합니다.
예:
참고
Point Cloud Library(PCL)를 사용하는 샘플은 시스템에 설치된 PCL 및 VTK 라이브러리 버전에 따라 충돌이 발생할 수 있습니다. 이 충돌은 PCL이 3D 시각화에 사용하는 VTK 라이브러리의 버그로 인해 발생합니다.
출처: https://github.com/PointCloudLibrary/pcl/issues/5237
해결 방법: PCL 1.13.1에는 VTK 버그를 우회하기 위한 수정 사항이 포함되어 있습니다.
PCL 1.13.1 이상으로 업데이트하세요. 필요한 경우 Linux 배포판에서 제공하는 PCL 라이브러리를 제거하고 소스에서 PCL 버전 1.13.1 이상을 빌드하세요(GitHub에서 다운로드할 수 있습니다).
Boost Libraries 설치하기#
Windows#
소스로부터 Point Cloud Library(PCL)를 빌드했거나 위에서 설명한 대로 All-in-one Installer를 사용하여 설치한 경우, PCL 빌드에 사용된 Boost 라이브러리는 blaze 샘플 빌드에도 자동으로 사용됩니다.
사용 가능한 PCL 라이브러리가 없지만 Boost 라이브러리가 필요한 blaze 샘플을 빌드하려는 경우, 소스에서 Boost 라이브러리를 빌드하거나 sourceforge.net에서 다운로드할 수 있는 사전 빌드된 바이너리를 사용하는 등의 방법으로 설치해야 합니다. 사용하는 Visual Studio 버전과 애플리케이션을 빌드할 아키텍처에 적합한 설치 프로그램을 다운로드하세요.
CMake가 설치된 Boost 라이브러리를 감지하지 못하는 경우, 다음을 설정해야 합니다. Boost_DIR CMake 변수. 이 변수는 다음이 포함된 디렉터리를 가리켜야 합니다. BoostConfig.cmake 파일
예제
- Open the CMakeSettings.json file (CMake -> Change CMake Settings -> blazeCppSamples).
- Add the following to the
cmakeCommandArgslist:-DBoost_DIR=\"C:\\local\\boost_1_84_0\\lib64-msvc-14.1\\cmake\\Boost-1.84.0\"
- Open the CMake Settings dialog (Project -> CMakeSettings for blazeCppSamples).
- Enter the following in the CMake command arguments field:
-DBoost_DIR="C:\local\boost_1_84_0\lib64-msvc-14.2\cmake\Boost-1.84.0" - Press Ctrl S to save the changes.
- Open the CMake Settings dialog (Project -> CMakeSettings for blazeCppSamples).
- Enter the following in the CMake command arguments field:
-DBoost_DIR="C:\local\boost_1_84_0\lib64-msvc-14.3\cmake\Boost-1.84.0" - Press Ctrl S to save the changes.
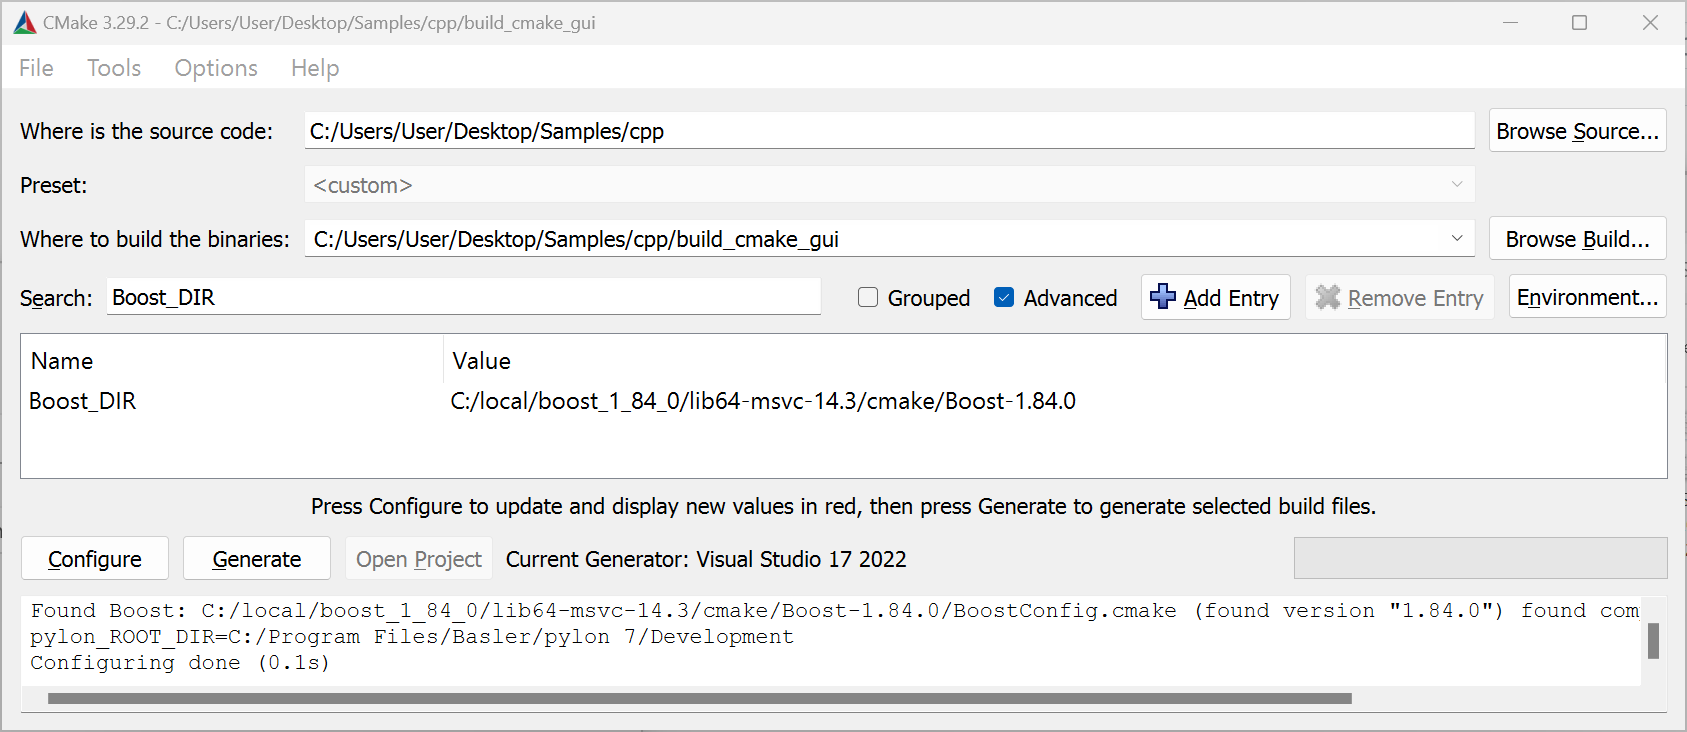
Before you can access the Boost_DIR in the CMake GUI, make sure that the Advanced check box is selected and the Grouped check box is deselected in the CMake GUI.
Linux#
CMake가 Boost 라이브러리를 찾지 못하는 경우, libboost 개발 패키지를 설치하거나 소스에서 Boost 라이브러리를 빌드해야 합니다.
Ubuntu 시스템에서는 다음 명령을 실행하여 libboost 개발 패키지를 설치할 수 있습니다.
예제 목록#
- FirstSample: blaze 카메라 조작에 대한 소개를 제공하며 3D 포인트 클라우드 데이터 검색 방법에 중점을 둡니다. pylon을 사용하여 그랩 루프를 구현하는 다양한 방법을 알아보려면 pylon C++ 샘플 스위트의 다음 샘플을 참조하세요.
- Grab_Strategies
- Grab_UsingBufferFactory
- Grab_UsingGrabLoopThread
- ParametrizeCamera: 카메라 파라미터에 액세스하는 방법을 설명합니다.
- DeviceRemovalHandling: 장치 제거를 감지하고 처리하는 방법을 설명합니다.
- GrabDepthMap: 그레이스케일 이미지로 표현된 3D 정보를 제공하는 깊이 맵을 그랩하고 해석하는 방법을 설명합니다.
- ConvertPointCloud2DepthMap: 3D 포인트 클라우드와 깊이 맵을 동시에 처리하려는 경우, 3D 포인트 클라우드에서 깊이 맵을 추출하는 방법을 보여주는 샘플을 참조하세요. 이 샘플은 또한 깊이 맵에 무지개 색상 매핑을 적용하는 방법을 보여줍니다.
- ShowPointCloud_PCL: Point Cloud Library(PCL)를 사용하여 Basler blaze 카메라로 그랩한 포인트 클라우드를 시각화하는 방법을 설명합니다.
- ConvertAndFilter_PCL: ShowPointCloud와 유사합니다. 3D 포인트 클라우드에 PCL 필터를 적용하는 방법을 설명합니다.
- SavePointCloud: GrabSingleImage 편의 메서드와 포인트 클라우드를 .pcd 텍스트 파일로 저장하는 방법을 설명합니다.
- SaveAndLoadPointCloudUsingPCL: PCL을 사용하여 포인트 클라우드를 파일에 보다 효율적으로 저장하는 방법을 설명합니다. 또한 이 샘플에서는 파일에서 포인트 클라우드를 로드하는 방법도 보여줍니다.
- FeatureDumper: 모든 카메라 파라미터와 해당 Property를 나열합니다. GenApi 사용법에 대한 고급 예시 역할을 합니다.
- DistortionCorrection: 사용자의 자체 캘리브레이션 데이터를 사용하기 위해 Distortion Correction을 비활성화하는 방법을 설명합니다.
- ExtrinsicTransformation: 포인트 클라우드에서 주 평면을 감지하고 외부 변환을 계산하여 카메라에 전달하는 방법을 설명합니다.
- MultiCam/ColorAndDepth/ColorAndDepthPtp: Basler blaze 및 Basler GigE 컬러 카메라 모두에서 이미지를 그랩하는 방법과 이미지 및 깊이 데이터에 액세스하는 방법을 설명합니다. 카메라는 PTP 및 Synchronous Free Run 기능을 사용하여 동기화됩니다.
- MultiCam/ColorAndDepth/Calibration: Basler GigE 컬러 카메라와 Basler blaze 카메라로 구성된 시스템을 캘리브레이션하는 방법을 설명합니다.
- MultiCam/ColorAndDepth/ColorAndDepthFusion: Basler GigE 컬러 카메라와 Basler blaze의 데이터를 결합하여 컬러 포인트 클라우드로 병합하는 방법을 설명합니다.
- MultiCam/ColorAndDepth/RgbdCamera: 다음과 유사함: ColorAndDepthFusion, 이 샘플은 Basler blaze와 Basler GigE 컬러 카메라의 데이터를 병합하여 컬러 포인트 클라우드로 만드는 방법을 보여줍니다. 이 샘플은 다음을 활용합니다.
RgbdCamera2D 컬러 카메라와 blaze를 결합하고 두 카메라를 단일 RGB-D 카메라처럼 인터페이스할 수 있게 해주는 클래스입니다. 결합된 두 카메라는 PTP(IEEE1588)와 Synchronous Free Run 기능을 사용하여 동기식으로 트리거됩니다. 소스 코드는 다음과 같습니다.RgbdCamera클래스는 동일한 폴더에 있습니다. 자체 응용 프로그램에서 RgbdCamera 클래스를 사용하려면 RgbdCamera.h 및 RgbdCamera.cpp 파일을 프로젝트에 추가해야 합니다. 또한 Multicam/MultiCamHelper 폴더의 .h 및 .cpp 파일도 추가해야 합니다. - MultiCam/DepthFusion/Calibration: 여러 대의 Basler blaze 카메라로 구성된 시스템을 캘리브레이션하는 방법을 설명합니다.
- MultiCam/DepthFusion/DepthFusion: 깊이 데이터를 병합하여 임의 개수의 카메라에서 병합된 포인트 클라우드를 표시하는 방법을 설명합니다.
- MultiCam/MultiChannel/MultiChannelFreeRun: 여러 대의 blaze 카메라를 광원이 서로 간섭하지 않도록 동시에 작동하는 방법을 보여줍니다. 카메라는 Free Run 모드로 작동합니다.
- MultiCam/MultiChannel/MultiChannelSwTrigger: 여러 대의 blaze 카메라를 광원이 서로 간섭하지 않도록 동시에 작동하는 방법을 보여줍니다. 카메라는 소프트웨어 트리거를 사용하여 트리거됩니다.
- MultiCam/SynchronousFreeRun/SynchronousFreeRun: PTP 클록 동기화 및 Synchronous Free Run 기능을 사용하여 여러 대의 blaze 카메라를 광원이 서로 간섭하지 않도록 동시에 작동하는 방법을 보여줍니다.
- MultiCam/MultiCamHelper: PTP(IEEE1588)를 사용하여 여러 카메라의 클록을 동기화하고 여러 카메라에서 이미지를 동기식으로 획득하기 쉽게 만드는 편의 클래스를 제공하는 라이브러리입니다. 이 라이브러리는 Synchronous Free Run 기능을 사용하여 여러 카메라에서 이미지를 획득하는 모든 샘플에서 사용됩니다. 프로젝트에 라이브러리를 추가하려면 이 폴더의 .h 및 .cpp 파일을 프로젝트에 추가하기만 하면 됩니다.
- Aravis/BasicSample: (Linux 전용) 오픈 소스 Aravis 라이브러리를 사용하여 blaze 카메라에서 데이터를 구성하고 획득하는 방법을 보여줍니다.
- Aravis/PointCloudSample: (Linux 전용) Aravis 라이브러리를 사용하여 획득한 데이터에서 3D 좌표(즉, 포인트 클라우드)를 계산하는 방법을 보여줍니다. 또한 이 샘플은 OpenCV를 사용하여 포인트 클라우드를 저장하고 시각화하는 방법도 보여줍니다.
애플리케이션 빌드 방법#
Windows#
Visual Studio 솔루션 사용#
Refer to the Common Settings for Building Applications with pylon section of the pylon C++ Programmer's Guide to learn how to set up a project for building applications using pylon.
Refer to the Common Settings for Building Applications with pylon section of the pylon C++ Programmer's Guide to learn how to set up a project for building applications using pylon.
CMake 사용#
pylon Supplementary Package for blaze에는 다음이 포함되어 있습니다. Findpylon.cmake pylon 및 pylon Supplementary Package for blaze의 설치 위치를 결정하는 데 사용되는 모듈입니다. 찾기 모듈은 다음을 내보냅니다. pylon::pylon CMake 타겟. 이 타겟을 인수로 전달합니다. target_link_libraries, 그러면 CMake가 인클루드 경로, 라이브러리 경로 등을 설정합니다.
기본 CMakeLists.txt CMake 파일은 다음과 같을 수 있습니다:
project (hello)

# Locate the CMake find module for pylon ...
# for Unix system. All other OS PYLON_ROOT will be empty
list(APPEND CMAKE_PREFIX_PATH $ENV{PYLON_ROOT})
# for Windows system. All other OS PYLON_DEV_DIR will be empty
list(APPEND CMAKE_PREFIX_PATH $ENV{PYLON_DEV_DIR})

find_package(pylon 7.1 REQUIRED)

add_executable(hello helloworld.cpp)
target_link_libraries(hello pylon::pylon)
project (hello)

# Locate the CMake find module for pylon ...
find_path(pylon_cmake Findpylon.cmake
    HINTS "$ENV{PYLON_DEV_DIR}/lib/cmake"
          "$ENV{ProgramFiles}/Basler/pylon 7/Development/lib/cmake"
          "$ENV{ProgramFiles}/Basler/pylon 6/Development/lib/cmake"
)
# ... and extend the CMake module path accordingly.
list(APPEND CMAKE_MODULE_PATH ${pylon_cmake})
# Locate pylon.
find_package(pylon 6.2 REQUIRED)

add_executable(hello helloworld.cpp)
target_link_libraries(hello pylon::pylon)
Linux#
CMake 사용#
project (hello)

# Locate the CMake find module for pylon ...
# for Unix system. All other OS PYLON_ROOT will be empty
list(APPEND CMAKE_PREFIX_PATH $ENV{PYLON_ROOT})
# for Windows system. All other OS PYLON_DEV_DIR will be empty
list(APPEND CMAKE_PREFIX_PATH $ENV{PYLON_DEV_DIR})

find_package(pylon 7.1 REQUIRED)

add_executable(hello helloworld.cpp)
target_link_libraries(hello pylon::pylon)
project (hello)

# Locate the CMake find module for pylon ...
find_path(pylon_cmake Findpylon.cmake
    HINTS "/opt/pylon/lib/cmake"
)
# ... and extend the CMake module path accordingly.
list(APPEND CMAKE_MODULE_PATH ${pylon_cmake})
# Locate pylon.
find_package(pylon 6.2 REQUIRED)

add_executable(hello helloworld.cpp)
target_link_libraries(hello pylon::pylon)
Make 파일 사용#
pylon으로 애플리케이션을 빌드하기 위한 컴파일러 및 링커 설정 조정 방법을 알아보려면 pylon C++ Programmer's Guide의 Common Settings for Building Applications with pylon 섹션을 참조하세요.
blaze 카메라용 Instant Camera 클래스#
pylon은 카메라 장치에 액세스하기 위한 다양한 유형의 클래스를 제공합니다. 로우 레벨 IPylon 장치 외에도, 카메라를 위한 편리한 하이 레벨 API를 제공하는 소위 Instant Camera 클래스가 있습니다.
이 Pylon::CInstantCamera 클래스는 blaze 카메라를 포함한 모든 Basler 카메라에 대한 일반적인 액세스를 제공합니다.
이 Pylon::CBaslerUniversalInstantCamera 클래스는 일반 Pylon::CInstantCamera 클래스를 확장하여 IntelliSense/코드 완성 기능을 사용하여 카메라 파라미터를 쉽게 설정하고 가져올 수 있는 파라미터 액세서 객체를 제공합니다.
이 Pylon::CBaslerUniversalInstantCamera 클래스는 모든 blaze 카메라 기능에 대한 파라미터 액세서를 제공하지 않습니다. 따라서 pylon Supplementary Package for blaze에는 다음이 포함되어 있습니다. Pylon::CBlazeInstantCamera 클래스. Basler는 대신 Basler blaze 카메라와 함께 해당 클래스를 사용할 것을 권장합니다.
선택하는 경우 CBaslerUniversalInstantCamera 클래스 대신 CBlazeInstantCamera 클래스를 사용하는 경우에도 blaze 카메라에서 제공하는 모든 카메라 파라미터를 설정하고 가져올 수 있습니다. 제공되는 액세서 객체가 없는 경우 CBaslerUniversalInstantCamera 클래스에서 소위 다음을 사용합니다. 일반적인 Property 액세스 다음 항목에서 설명하는 바와 같이 이름을 통해 Property에 액세스하려면 일반적인 Property 액세스 섹션 pylon C++ Programmer's Guide.
예:
using namespace Pylon;
GenApi::INodeMap& nodemap = camera.GetNodeMap();
CIntegerParameter filterStrength(nodemap, "FilterStrength" );
std::cout << "Filter strength: " << filterStrength.GetValue() << std::endl;
blaze 카메라 열기 및 액세스#
blaze 카메라 객체를 생성하고 여는 과정은 세 단계로 이루어집니다:
- 액세스하려는 카메라에 대한 카메라 객체를 생성합니다.
일반적으로 다음의 인스턴스를 생성해야 합니다.Pylon::CBlazeInstantCamera클래스. - 기본 구성을 적용하는 blaze 전용
Pylon::CBlazeDefaultConfiguration구성 이벤트 처리기를 등록합니다.
Open3D를 사용하여 포인트 클라우드를 계산하고 시각화하는 방법의 예는 카메라 구성 핸들러 등록하기 blaze 구성 이벤트 처리기 클래스에 대한 자세한 내용은 해당 섹션을 참조하십시오. - 메서드를
Open()호출하여 카메라 장치와의 연결을 설정합니다.
다음 예시는 이 세 가지 단계를 보여줍니다:
#include <pylon/PylonIncludes.h>
using namespace Pylon;

// ....

// Before using any pylon methods, the pylon runtime must be initialized.
PylonInitialize();

try {
  // 1: Create a camera object for the first available blaze camera.
  CBlazeInstantCamera camera(CTlFactory::GetInstance().CreateFirstDevice(
      CDeviceInfo().SetDeviceClass(BaslerGenTlBlazeDeviceClass))
  );

  // 2. Register the default configuration.
  camera.RegisterConfiguration(
    new CBlazeDefaultConfiguration,
    RegistrationMode_ReplaceAll,
    Cleanup_Delete);

  // 3. Open the camera, i.e., establish a connection to the camera device.
  camera.Open();

  // Use the camera.
  std::cout << "Connected to camera "
    << camera.GetDeviceInfo().GetFriendlyName() << std::endl;
  // .....

  // Close the connection.
  camera.Close();
} catch (const GenICam::GenericException& e) {
  std::cerr << "Exception occurred: " << std::endl
    << e.GetDescription() << std::endl;
}

// Releases all pylon resources.
PylonTerminate();
오류가 발생하면 다음에서 상속되는 예외가 GenICam::GenericException 발생합니다.
일반적인 오류 조건:
- blaze 카메라를 찾을 수 없음:
CreateFirstDevice()함수가 예외를 발생시킵니다. - blaze Viewer와 같은 다른 애플리케이션에서 이미 열려 있어 카메라를 열 수 없는 경우:
Open()메서드가 예외를 발생시킵니다.
다음 하위 섹션에서는 카메라 객체를 생성하고 여는 방법에 대한 보다 자세한 정보를 제공합니다.
사용 가능한 첫 번째 blaze 카메라에 대한 카메라 객체 생성#
다음을 사용하십시오. Pylon::CTlFactory::CreateFristDevice() 메서드를 사용하여 사용 가능한 첫 번째 카메라에 대한 카메라 객체를 생성합니다. 시스템에 연결되었거나 네트워크를 통해 액세스할 수 있는 다른 유형의 카메라에 대해 CreateFirstDevice() 가 카메라 클래스를 생성하는 것을 방지하려면 항상 blaze 카메라용 pylon 장치 클래스 식별자를 지정해야 합니다.
CBlazeInstantCamera camera(CTlFactory::GetInstance().CreateFirstDevice(
    CDeviceInfo().SetDeviceClass(BaslerGenTlBlazeDeviceClass)));
);
blaze 카메라를 찾을 수 없는 경우 카메라 및 네트워크 어댑터의 IP 구성 설정을 확인하십시오. 네트워크 설정에 대한 자세한 내용은 Network Configuration 항목을 참조하십시오.
특정 blaze 카메라에 대한 카메라 객체 생성#
pylon C++ Programmer's Guide의 Advanced Topics 항목에 있는 Creating Specific Cameras 섹션에서는 특정 카메라를 선택하는 방법에 대한 정보를 제공합니다.
예를 들어 일련번호를 지정하여 특정 blaze 카메라를 열려면, blaze 카메라용 pylon 장치 클래스 식별자를 CreateFirstDevice()에 전달하는 것 외에도 추가적인 Property를 지정할 수 있습니다.
다음 코드 조각은 일련 번호로 blaze 카메라를 여는 방법을 보여줍니다.
CBlazeInstantCamera camera(CTlFactory::GetInstance().CreateFirstDevice(
  CDeviceInfo()
  .SetDeviceClass(BaslerGenTlBlazeDeviceClass)
  .SetSerialNumber("23298299")
));
사용자 지정 이름으로 blaze 카메라를 열려면 다음 줄을 사용합니다:
CBlazeInstantCamera camera(CTlFactory::GetInstance().CreateFirstDevice(
  CDeviceInfo()
  .SetDeviceClass(BaslerGenTlBlazeDeviceClass)
  .SetUserDefinedName("MyCamera")));
사용자 지정 이름
다음을 사용하여 카메라에 사용자 지정 이름을 할당할 수 있습니다. DeviceUserID parameter. blaze Viewer, pylon IP Configurator 또는 pylon API에서 이 작업을 수행할 수 있습니다:
IP 주소로 디바이스 생성
현재는 CreateFirstDevice() 함수를 사용하여 카메라 IP 주소를 지정할 수 없습니다. 그 이유는 현재 Pylon::CDeviceInfo() 클래스에 카메라의 IP 주소에 대한 정보가 포함되어 있지 않기 때문입니다.
특정 IP 주소를 가진 카메라를 생성하고 열려면, 먼저 모든 카메라를 열거하고, 반환된 목록을 순회한 다음, IP 주소 및 기타 네트워크 관련 정보를 조회하기 전에 각 카메라를 열어야 합니다. 이 절차는 Enumerate blaze Cameras 섹션에 나와 있습니다.
원하는 blaze 카메라를 찾지 못한 경우, 속성에 올바른 값을 사용하고 있는지 확인하고 카메라 및 네트워크 어댑터의 IP 구성 설정을 점검하십시오. 네트워크 설정에 대한 자세한 내용은 Network Configuration 항목을 참조하십시오.
blaze 카메라 열거하기#
다음 코드 조각은 연결된 모든 blaze 카메라의 목록을 가져오는 방법을 보여줍니다. 목록의 각 요소에 대해 카메라가 열리고 일부 카메라 파라미터 값이 출력됩니다.
#include <pylon/PylonIncludes.h>
#include <ostream>
using namespace Pylon;

// ....

// Before using any pylon methods, the pylon runtime must be initialized.
PylonInitialize();

// ....

// Enumerate all blaze cameras.
CTlFactory& TlFactory = CTlFactory::GetInstance();
DeviceInfoList_t lstDevices;
DeviceInfoList_t filter;
filter.push_back(CDeviceInfo().SetDeviceClass(BaslerGenTlBlazeDeviceClass));
TlFactory.EnumerateDevices(lstDevices, filter);
if (!lstDevices.empty()) {
    DeviceInfoList_t::const_iterator it;
    for (it = lstDevices.begin(); it != lstDevices.end(); ++it) {
        std::cout << it->GetFullName();

    // Open camera, i.e., establish a connection to the camera device.
    CBlazeInstantCamera camera(CTlFactory::GetInstance().CreateDevice(*it));
    camera.RegisterConfiguration(
      new CBlazeDefaultConfiguration,
      RegistrationMode_ReplaceAll, Cleanup_Delete);
    camera.Open();

    // Print out some information.
    std::cout << "Connected to camera "
      << camera.GetDeviceInfo().GetFriendlyName() << std::endl;
    std::cout << "IP Address: "
      << camera.GevCurrentIPAddress.GetValue() << std::endl;
    std::cout << "User-defined name: "
      << camera.DeviceUserID.GetValue() << std::endl;
    std::cout << "Serial Number: "
      << camera.DeviceSerialNumber.GetValue() << std::endl;
}  // The connection will be closed automatically when leaving the scope here.
else {
    std::cerr << "No devices found!" << std::endl;
}
카메라 구성 핸들러 등록하기#
pylon Instant Camera 클래스를 사용하면 특정 이벤트(예: Open() 메서드가 호출될 때) 발생 시 카메라 설정을 적용하는 데 사용할 수 있는 구성 이벤트 핸들러 객체를 등록할 수 있습니다.
pylon Supplementary Package for blaze에는 다음이 포함되어 있습니다. Pylon::CBlazeDefaultConfiguration 클래스. Basler는 생성하는 각 CBlazeInstantCamera 클래스 인스턴스에 대해 항상 이 구성을 등록할 것을 권장합니다.
camera.RegisterConfiguration(
      new CBlazeDefaultConfiguration,
      RegistrationMode_ReplaceAll, Cleanup_Delete);
이 CBlazeDefaultConfiguration::OnOpened() 메서드는 데이터 스트림에 깊이, 강도 및 신뢰도 정보가 포함되도록 구성합니다. 깊이 정보는 포인트 클라우드로 전송됩니다. 포인트 클라우드에는 각 센서 픽셀에 대한 3D 좌표가 포함되어 있습니다. CBlazeDefaultConfiguration::OnOpened() 메서드는 또한 카메라를 소위 프리런 모드로 전환합니다. 프리런 모드에서는 획득이 시작된 후 소프트웨어 또는 하드웨어 트리거 없이 카메라가 연속적으로 데이터를 스트리밍합니다.
기본 구성이 등록된 경우 CBlazeDefaultConfiguration::OnOpened() 메서드가 자동으로 호출됩니다. CBlazeInstantCamera::Open().
이 CBlazeDefaultConfiguration 클래스는 헤더 전용 클래스입니다. pylon SDK의 includes 폴더에 있는 BlazeDefaultConfiguration.h 파일을 열어 코드를 확인할 수 있습니다.
- Windows:
%Program Files%\pylon\Development\include\pylon - Linux:
/opt/pylon/include/pylon
여러 구성 이벤트 핸들러 클래스를 등록할 수 있습니다.
다음 예제는 추가 설정을 적용하는 구성 이벤트 핸들러를 등록하는 방법을 보여줍니다.
class MyConfigurationHandler : public CBlazeConfigurationEventHandler
{
public:
    // Sets exposure time to minimum possible value.
    void OnOpened(CBlazeInstantCamera& camera) override
    {
        camera.ExposureTime.SetToMinimum();
    }
};

// ....

// Register the default configuration first.
camera.RegisterConfiguration(
      new CBlazeDefaultConfiguration,
      RegistrationMode_ReplaceAll, Cleanup_Delete);

// Then, register additional configuration event handlers.
camera.RegisterConfiguration(
      new MyConfigurationHandler,
      RegistrationMode_Append, Cleanup_Delete);

// ....

camera.Open(); // Configurations will be applied.
pylon 카메라 이벤트 핸들러 클래스에 대한 자세한 내용은 pylon C++ Programmer's Guide의 Instant Camera Event Handler Basics 섹션을 참조하십시오.
구성 이벤트 핸들러를 제공하여 원하는 설정을 적용할 필요는 없습니다. 대신, 다음 메서드가 호출된 후 CBlazeInstantCamera::Open() 메서드를 호출하여 카메라와의 연결이 설정됩니다.
카메라 파라미터 값을 설정하고 가져오는 방법에 대한 정보는 Accessing Parameters 섹션을 참조하십시오.
카메라에 연결#
카메라 객체를 생성하고 구성 이벤트 핸들러를 등록한 후, CBlazeInstantCamera::Open() 메서드를 호출하여 카메라와의 연결이 설정됩니다.
연결은 CBlazeInstantCamera::Close() 메서드가 호출됩니다. CBlazeInstantCamera 의 소멸자는 명시적으로 호출되지 않은 경우 자동으로 Close() 을(를) 호출합니다.
카메라가 주기적으로 하트비트 요청을 수신하지 못하면 카메라는 연결을 닫습니다. 하트비트 요청 누락은 애플리케이션이 충돌하거나 디버거에 의해 중단될 때 발생합니다. 자세한 내용은 Debugging Applications and Controlling the GigE Vision Heartbeat 섹션을 참조하십시오.
파라미터 액세스#
pylon API를 사용하여 카메라 파라미터에 액세스하는 방법을 익히려면 pylon C++ Programmer's Guide의 Accessing Parameters 섹션을 참조하십시오.
pylon C++ 샘플 Parametrize_NativeParameterAccess 및 Parametrize_GenericParameterAccess는 pylon을 사용하여 카메라 파라미터에 액세스하는 일반적인 방법을 보여줍니다.
다음 코드 샘플은 다음을 사용하여 자주 사용되는 blaze 전용 카메라 파라미터를 설정하고 가져오는 방법을 보여줍니다. CBlazeInstantCamera 클래스.
// Include files to use the pylon API
#include <pylon/PylonIncludes.h>
#include <pylon/BlazeInstantCamera.h>

// Namespaces for using the pylon API and the blaze camera parameters
using namespace Pylon;
using namespace BlazeCameraParams_Params;

// ...

// Set the operating mode of the camera. The choice you make here
// affects the working range of the camera, i.e., the Minimum Working
// Range and Maximum Working Range parameters.
OperatingModeEnums oldOperatingMode = camera.OperatingMode.GetValue();
camera.OperatingMode.SetValue(OperatingMode_LongRange);

// Exposure time of the camera. If the operating mode is changed, the
// exposure time is set to the recommended default value.
camera.ExposureTime.SetValue(750); // us

// Enable and configure image filtering.

// The spatial noise filter uses the values of neighboring pixels to
// filter out noise in an image.
camera.SpatialFilter.SetValue(true);

// The temporal noise filter uses the values of the same pixel at
// different points in time to filter out noise in an image.
camera.TemporalFilter.SetValue(true);
camera.TemporalFilterStrength.SetValue(220);

// The outlier removal removes pixels that differ significantly from
// their local environment.
camera.OutlierRemoval.SetValue(true);

// Some properties have restrictions.
// We use API functions that automatically perform value corrections.
// Alternatively, you can use GetInc() / GetMin() / GetMax() to make sure you
// set a valid value.
camera.ConfidenceThreshold.SetValue(321, IntegerValueCorrection_Nearest);

// Not all functions are available in older cameras.
// Therefore, we must use "Try" functions that only perform the action
// when parameters are writable. Otherwise, we would get an exception.
camera.MultiCameraChannel.TrySetValue(1);

std::cout << "Operating Mode           : "
    << camera.OperatingMode.GetValue() << std::endl;
std::cout << "Exposure Time            : "
    << camera.ExposureTime.GetValue() << std::endl;
std::cout << "Spatial Filter           : "
    << camera.SpatialFilter.GetValue() << std::endl;
std::cout << "Temporal Filter          : "
    << camera.TemporalFilter.GetValue() << std::endl;
std::cout << "Temporal Filter Strength : "
    << camera.TemporalFilterStrength.GetValue() << std::endl;
std::cout << "Outlier Removal          : "
    << camera.OutlierRemoval.GetValue() << std::endl;
std::cout << "Confidence Threshold     : "
    << camera.ConfidenceThreshold.GetValue() << std::endl;
if (camera.MultiCameraChannel.IsReadable())
    std::cout << "Multi-Camera Channel : "
    << camera.MultiCameraChannel.GetValue() << std::endl;

// Restore the old operating mode.
camera.OperatingMode.SetValue(oldOperatingMode);

// Close the camera.
camera.Close();
blaze Viewer는 Documentation 창을 제공합니다. Features 창에서 카메라 파라미터를 선택하면 Documentation 창에 선택한 파라미터에 대한 정보와 해당 카메라 파라미터의 값을 가져오고 설정하는 방법을 보여주는 C++ 및 C# 코드 조각이 표시됩니다.
데이터 취득#
pylon API를 사용하여 데이터를 획득하는 방법을 익히려면 pylon C++ Programmer's Guide의 Grabbing Images 섹션을 참조하십시오.
pylon은 캡처한 이미지를 GrabResults라는 데이터 구조로 표현합니다. 2D 카메라로 획득한 GrabResults에는 단일 그레이 밸류 또는 컬러 이미지가 포함됩니다.
blaze 카메라로 캡처한 GrabResults에는 여러 컴포넌트가 포함됩니다. 기본적으로 각 GrabResult에는 강도 이미지, 신뢰도 맵, 깊이 정보가 저장됩니다.
Range component에 설정된 Pixel Format에 따라 깊이 데이터는 2D 깊이 맵 또는 3D 포인트 클라우드로 표현될 수 있습니다. 기본적으로 깊이 데이터는 포인트 클라우드로 표현됩니다.
깊이 맵을 활성화하려면 Range component의 Pixel Format을 다음으로 설정하십시오. PixelFormat_Coord3D_16C:
// Enable depth maps by enabling the Range component and setting the
// appropriate pixel format.
camera.ComponentSelector.SetValue(ComponentSelector_Range);
camera.ComponentEnable.SetValue(true);
camera.PixelFormat.SetValue(PixelFormat_Coord3D_C16);
포인트 클라우드를 활성화하려면 Range component의 Pixel Format을 다음으로 설정하십시오. PixelFormat_Coord3D_ABC32f:
// Enable point clouds by enabling the Range component and setting the
// appropriate pixel format.
camera.ComponentSelector.SetValue(ComponentSelector_Range);
camera.ComponentEnable.SetValue(true);
camera.PixelFormat.SetValue(PixelFormat_Coord3D_ABC32f);
자세한 내용은 Component Selector 및 Pixel Format 항목을 참조하십시오.
정보
카메라가 포인트 클라우드와 깊이 정보를 동시에 전송하도록 설정하는 것은 불가능합니다.
Processing Measurement Results 항목에서는 깊이 맵에서 포인트 클라우드를 계산하는 방법을 설명합니다.
이 변환은 blaze 카메라용 GrabDepthMap C++ programming sample에서도 확인할 수 있습니다.
포인트 클라우드에서 깊이 맵을 검색하는 방법은 blaze 카메라용 ConvertPointCloud2DepthMap C++ programming sample에 나와 있습니다.
그랩 루프#
pylon은 그랩 루프 설정을 위한 다양한 접근 방식을 지원하며 메모리 버퍼를 처리하기 위한 다양한 전략을 제공합니다.
자세한 내용은 pylon C++ Programmer's Guide의 Grabbing Images 섹션을 참조하십시오.
다음 코드 조각은 일반적인 그랩 루프를 보여 줍니다.
#include <pylon/PylonIncludes.h>
#include <pylon/BlazeInstantCamera.h>

using namespace Pylon;
using namespace BlazeCameraParams_Params;

// ....
PylonInitialize();

CBlazeInstantCamera camera(CTlFactory::GetInstance().CreateFirstDevice(
  CDeviceInfo().SetDeviceClass(BaslerGenTlBlazeDeviceClass)));
camera.RegisterConfiguration(
  new CBlazeDefaultConfiguration, RegistrationMode_ReplaceAll, Cleanup_Delete);
camera.Open();

size_t nBuffersGrabbed= 0;

// This smart pointer will receive the grab result data.
CGrabResultPtr ptrGrabResult;

camera.StartGrabbing();

while (camera.IsGrabbing() && nBuffersGrabbed < 10) {
  // Wait for an image and then retrieve it. A timeout of 1000 ms is used.
  camera.RetrieveResult(1000, ptrGrabResult, TimeoutHandling_ThrowException);

  // Data grabbed successfully?
  if (ptrGrabResult->GrabSucceeded()) {
      nBuffersGrabbed++;
      // Access the data.
      // ....
  } else {
    // Error handling
    std::cerr << "Grab error occurred: " << ptrGrabResult->GetErrorDescription() << std::endl;
  }
}
// Clean-up
camera.StopGrabbing();
camera.Close();
컴포넌트 액세스#
GrabResult의 개별 구성 요소에 액세스하려면 다음을 사용할 수 있습니다. Pylon::CPylonDataContainer 및 Pylon::CPylonDataComponent 클래스입니다. 컨테이너는 하나 이상의 컴포넌트를 담을 수 있습니다. 컨테이너를 사용하여 컴포넌트 개수를 조회하고 특정 컴포넌트를 가져올 수 있습니다. 컨테이너 내의 각 컴포넌트는 깊이 값과 같은 실제 데이터 및 메타데이터를 보유합니다.
다음을 사용하십시오. Pylon::CGrabResultData::GetDataContainer() method to get access to a GrabResult's CPylonDataContainer. Use the Pylon::CPylonDataContainer::GetDataComponent() method to access a component by specifying the index of the component.
pylon이 여러 컴포넌트를 포함하는 GrabResults에 대한 액세스를 제공하는 방법에 대한 자세한 내용은 pylon C++ Programmer's Guide의 Advanced Topics 항목에 있는 Multi-Component Grab Results 섹션을 참조하십시오.
예:
#pragma pack(push, 1)
struct Point
{
    float x;
    float y;
    float z;
};
#pragma pack(pop)

// ...

// By registering the CBlazeDefaultConfiguration, depth, intensity, and confidence data will be delivered.
// Depth data is represented as point clouds.
camera.RegisterConfiguration(new CBlazeDefaultConfiguration, RegistrationMode_ReplaceAll, Cleanup_Delete);
camera.Open();

//....

if (ptrGrabResult->GrabSucceeded())
{
  // Get access to the container.
  auto container = ptrGrabResult->GetDataContainer();

  // Access the container's components.
  // Iterate through all components in the container.
  for (size_t i = 0; i < container.GetDataComponentCount(); ++i)
  {
      // Get one component from the container.
      const Pylon::CPylonDataComponent component = container.GetDataComponent(i);
      if ( !component.IsValid() )
          continue;

      // Is this the intensity component?
      if ( component.GetComponentType() == Pylon::ComponentType_Intensity )
      {
          const Pylon::EPixelType pixelType = component.GetPixelType();

          // Get a pointer to the pixel data.
          const void* pPixels = component.GetData();

          // Process intensity values here (pixel data).
          // [...]
      }
  }

  auto rangeComponent = container.GetDataComponent(0);
  auto intensityComponent = container.GetDataComponent(1);
  auto confidenceComponent = container.GetDataComponent(2);

  // Retrieve the 3D coordinates corresponding to the center pixel.
  const auto width = rangeComponent.GetWidth();
  const auto height = rangeComponent.GetHeight();
  const uint32_t u = (int)(0.5 * width);
  const uint32_t v = (int)(0.5 * height);
  auto pPoint =
    reinterpret_cast<const Point*>(rangeComponent.GetData()) + u + v * width;
  uint16_t* pIntensity =
    (uint16_t*)intensityComponent.GetData() +  v * width + u;
  uint16_t* pConfidence
    = (uint16_t*)confidenceComponent.GetData() + v * width + u;
  if (pPoint->z != 0)
      std::cout << "x=" << pPoint->x
        << " y=" << pPoint->y
        << " z=" << pPoint->z << "\n";
  else
      std::cout << "x=   n/a y=   n/a z=   n/a\n";
  std::cout << " intensity=" << *pIntensity
            << " confidence=" << *pConfidence << "\n";
}
else
{
    // Error handling
    std::cerr << "Grab error occurred: " << ptrGrabResult->GetErrorDescription() << std::endl;
}
파라미터를 사용하여 ComponentSelector 및 ComponentEnable 카메라 파라미터를 사용하여 개별 컴포넌트를 활성화/비활성화할 수 있습니다. blaze 카메라의 경우 컨테이너 내 컴포넌트의 순서는 항상 다음과 같습니다.
- Range
- Intensity
- Confidence
예를 들어, Range 및 Confidence component가 활성화되고 Intensity component가 비활성화된 경우, container.GetDataComponent(0) 은(는) Range component를 검색하며, container.GetDataComponent(1) 은(는) Confidence component를 반환합니다. 액세스를 시도하면 container.GetDataComponent(2) Intensity component를 비활성화했기 때문에 컨테이너에 두 개의 컴포넌트만 존재하여 오류가 발생합니다.
그랩 결과를 처리하는 애플리케이션의 일부에서 어떤 컴포넌트를 예상해야 할지 사전에 알 수 없는 경우, 컨테이너를 반복하고 각 컴포넌트의 타입을 확인하여 컴포넌트에 액세스하는 보다 일반적인 방법을 선택해야 합니다. CPylonDataComponent::GetComponentType() 메서드를 호출하여 카메라와의 연결이 설정됩니다.
예:
camera.RetrieveResult(1000, ptrGrabResult, TimeoutHandling_ThrowException);
// Data grabbed successfully?
if (ptrGrabResult->GrabSucceeded()) {
  // Access the data.
  auto container = ptrGrabResult->GetDataContainer();

  CPylonDataComponent rangeComponent;
  CPylonDataComponent intensityComponent;
  CPylonDataComponent confidenceComponent;

  // Iterate through all components in the container.
  for (size_t i = 0; i < container.GetDataComponentCount(); ++i) {
      const Pylon::CPylonDataComponent component = container.GetDataComponent(i);
      if (!component.IsValid())
          continue;
      switch (component.GetComponentType())
      {
      case ComponentType_Intensity:
          intensityComponent = component;
          break;
      case ComponentType_Confidence:
          confidenceComponent = component;
          break;
      case ComponentType_Range:
          rangeComponent = component;
          break;
      }
  }
  if (rangeComponent.IsValid()) {
    const auto width = rangeComponent.GetWidth();
    const auto height = rangeComponent.GetHeight();
    // Process depth data.
  }
  if (intensityComponent.IsValid()) {
    // Process intensity image.
  }
  if (confidenceComponent.IsValid())
  {
    // Process confidence data.
  }
}
깊이 데이터 해석#
Processing Measurement Results 항목에서는 Range component에 저장된 깊이 데이터의 형식에 대한 정보를 제공합니다.
응용 프로그램 디버깅 및 GigE Vision 하트비트 제어#
blaze 카메라와 같은 GigE Vision 카메라는 카메라를 제어하는 애플리케이션이 여전히 실행 중인지 확인하기 위해 애플리케이션이 주기적으로 카메라에 액세스할 것을 요구합니다. 따라서 전송 계층은 주기적으로 카메라에 네트워크 요청(하트비트)을 보냅니다. 카메라의 하트비트 타임아웃 설정에 지정된 시간 내에 이러한 하트비트를 수신하지 못하면 연결이 끊어진 것으로 간주하고 연결을 닫습니다. 즉, 애플리케이션의 명령을 더 이상 수신하지 않습니다. 하트비트 타임아웃의 기본값은 3000 ms입니다.
애플리케이션을 디버깅하는 동안 중단점에 도달하면 디버거는 하트비트를 보내는 스레드를 포함한 모든 스레드를 일시 중단합니다. 애플리케이션이 일시 중단되었거나 코드를 한 줄씩 실행하는 동안 카메라가 연결을 닫는 것을 방지하기 위해 전송 계층은 자동으로 하트비트 타임아웃을 늘립니다(pylon 7.1 이상을 사용하는 경우 1시간, 그렇지 않은 경우 5분). pylon 7.1 이상을 사용하는 경우 애플리케이션이 종료되거나 충돌하면 카메라와의 연결이 자동으로 닫힙니다.
pylon 7.0 이하 버전 사용 시 재연결 문제
카메라와의 연결을 정상적으로 닫기 전에 애플리케이션이 종료되거나 중단되면, 하트비트 타임아웃이 만료될 때까지 카메라는 연결된 상태를 유지합니다. 하트비트 타임아웃이 만료될 때까지 카메라는 추가적인 연결 시도를 거부합니다. 애플리케이션을 다시 시작하거나 카메라에 액세스하는 다른 애플리케이션을 시작할 때 장치가 현재 사용 중이라는 오류가 발생합니다.
이 문제는 보통 디버거를 사용하여 애플리케이션을 중지하거나 애플리케이션이 예기치 않게 종료될 때 발생합니다. 카메라를 다시 열려면 타임아웃이 경과할 때까지 기다리거나 네트워크에서 카메라를 일시적으로 연결 해제해야 합니다.
이 문제를 해결하려면 디버거 제어하에 애플리케이션이 실행 중일 때 하트비트 타임아웃의 자동 조정을 재정의할 수 있으며, 환경 변수 이름을 GEV_HEARTBEAT_TIMEOUT (으)로 설정하여 원하는 타임아웃(밀리초 단위)을 지정할 수 있습니다. 또는 샘플 프로그램에 표시된 대로 pylon API를 사용하여 애플리케이션에서 하트비트 타임아웃을 설정할 수 있습니다. DeviceRemovalHandling 샘플 프로그램.